LabVIEW: Event Structure vs While Loop

When I started working with Event Structures in LabVIEW, I wondered what the difference was in terms of CPU usage. In a small program, managing efficiency might not be an issue but in a large testing environment where many processes need to be performed, the need for managing efficiency becomes quite important.
To test the difference in CPU usage between using the standard While Loop, which can get messy very quickly and the Event Structure, I wrote a simple program. The While Loop and Event Structure options are placed in different cases which is selected before the program is run. Both options monitor two buttons, display a message when either button is pressed and has a counter which shows how many times the loop is run.
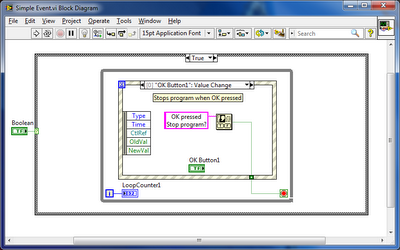
The Event Structure monitors two buttons and displays a message for each. 
The While Loop also monitors two buttons but as it can be seen from the front panel above, it is quite a bit more messy than the Event Structure. If any more button or inputs need to be monitored, this method can quite easily get out of hand.
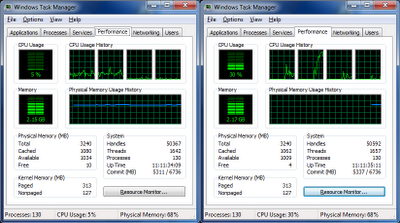
Here is the CPU monitor comparison of the two options being run. On the left is the Event Structure only using 5% and on the right is the While Loop which is using 30%. There are ways to slow the While Loop down like adding a loop delay but I wanted to show the extremes.
I hope this helps and can provide some display on the different ways to do a similar process.
To download the example VI, use this link.
Greg
LabVIEW: Creating custom buttons

It’s been something that I have been thinking about for a while but never really got round to trying. Creating custom buttons have a number of different applications and they are really easy to make.
To start off, you either need to decide if you want a button with an emblem (same image for true and false) or if you want a button that has a different image for true and false. You also need to find the images that you want displayed on the buttons. A good place to start is a clipart website like this one.

Download the images and then resize them. I use an image size of about 60px x 60px.
  • Open the LabVIEW start up window and under New, select More
  • Under Other Files, select Custom Control
  • We now need to place a button so we can change what it looks like
  • Place a button control onto the front panel
  • Select your first image by navigating to Edit >> Import Picture to Clipboard
  • Right click on the button and select Import Picture from Clipboard >> True/False/Decal
  • True will display the picture when the button is in a true state. False will display the picture when the button is in a false state. Decal will embed the picture for all states.
  • Do the same process to attach the next image for the other state
  • Save the control and then use it in a normal VI
That’s about it. Pretty simple to create custom controls.
To download the example control, use this link.
Greg

LabVIEW: Simple event structure

I searched everywhere to get an example or some help of a simple event structure and a state machine working together. I have used state machines extensively and really like the way they work but never tried implementing an event structure into it.
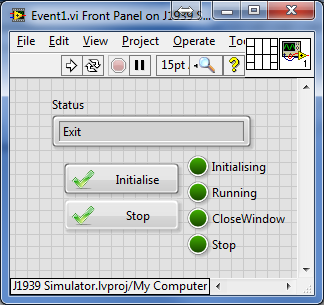
Here is a very simple state machine which runs through an initialising state and then sits in a running state. The event structure is in the running state and monitors the two button for a state change and also the close window button. 
Initialise button: Takes the program back into the Initialising state.
Stop button: Takes the program into the Stop state and then stops the program.
Close Window: Show a message that the program must first be stopped before it can be closed. Then takes the program into the CloseWindow state and then back to the Running state.

I am sure there are much better ways to perform this task so if you have any tips please leave me a comment. As soon as I find a more efficient process, I will be sure to update this post and program.
To download the example VI, use this link.
Greg
LabVIEW: Sending an email to a gmail account

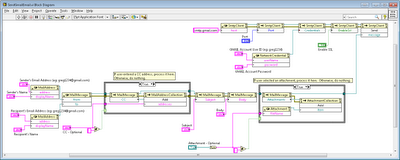
Logging to a database in a LabVIEW application has its uses, however sending test results as an email can also be very useful. Sending an email to a Google (gmail) account is relatively simple using .NET constructors.

By using the various constructors, an email can be sent using an existing gmail account. (Click here to get a gmail account.) The email can be sent to a recipient, carbon copied to a recipient and even have an attachment added. 
By using the VI as part of an application, any string can be written and sent as an email. I used this VI to email results for an automated test so that I could monitor its progress after each test was completed. Logging to a database is also very effective but sometimes it’s easier to access an email account over accessing a results database.
To download the example VI, use this link.
Greg

LabVIEW: Reinitialise all indicators

There are times in a LabVIEW program that where you need to reinitialise all the front panel indicators and controls to their respective default values. I like to do this as the first step before the VI is run so that I know that everything is in a default state.

This can be done by using a property node for each indicator or control. With large programs this can become very tedious and add a significant amount of unwanted clutter.

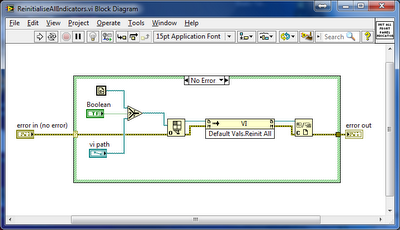
There is another, easy way to accomplish this and that is to use a reference to the current vi and an invoke node. 

By adding this VI at the start of your program, all the indicators and controls are initialised to their default values. 

To download the example VI, use this link.

Greg