UK Certified LabVIEW Developer Summit 2014

Over the last two days, the UK Certified LabVIEW Developer Summit has been taking place at National Instruments Headquarters in Newbury. We were treated to some very interesting presentations, by some extremely experienced LabVIEW Developers and Architects.

Certified-LabVIEW-Developer_rgb

I enjoy going to these types of events as you get to meet lots of people from different industries, all with a common goal that is LabVIEW.

Over the two days, there were around 12 presentations ranging from designing slick user interfaces to how to deal with customers and build business relationships. Some I could follow and some were a bit above my level, however I am happy that I managed to get something out of each presentation.

I find with these events that there is so much information being passed around, that it is difficult to take it all in. To help with this, I always make a list of items that I go and research after the events. I also realise over and over again, no matter how much we think we know, there is always something new to be learnt.

Here are some of the many key points that I got from the presentations.

  • Design user interfaces with the user/operator in mind. This might seem obvious, but what if the user is colour blind and you have buttons with varying colours? – Samuli Bergström
  • There are guidelines for Human Interface Design which can be followed and they can be different for various platforms. – Samuli Bergström
  • The LabVIEW project provides an interface to perform Unit Testing of vi’s. This can be very useful when working with legacy code or when starting out a project and you want to employ a Test Driven Development approach. – Martin Griffiths
  • Using user events to update a front panel. This is moving towards an MVC architecture and really made sense to me why it should be used. – Ian Sheppard
  • How to pass the Certified LabVIEW Architect exam. This is something that I have been thinking about for a few weeks. My aim is to learn and develop my LabVIEW skills over the next few years so that I am ready to write the CLA exam in 2-3 years time. It might seem like there is a lot of time to go, but time flies when you are having fun so having a plan is a good idea. – Samuli Bergström
  • Leading on from my CLA aspirations, a Private and Public Message Handler application framework was demonstrated. This uses a combination of user events and the command pattern to implement a singleton design. I got some of it, but will definitely be working through the code to try and understand how the whole framework works. There was a lot to take in and and I need some time to process it. – Chris Roebuck
  • You can partition RAM into a virtual drive to help when working with large data sets. – James McNally
  • The amount of data logged can quickly and easily get out of hand if not monitored closely. – James McNally
  • How to become a Trusted Advisor and to control the monkey on your back. – Malcom Myers
  • How to speak to and what questions to ask a potential customer/employer. – Malcom Myers
  • How to manage TCP, UDP and NS connections reliably. – Mike Bailey

I also did a presentation which was way out of my comfort zone. This is really not something that I would normally volunteer for, but gave it a go and actually enjoyed it. I will definitely put my hand up and volunteer again when I have something to speak on. My presentation and code can be found on the CLD Summit community if you interested and I hope to do a blog post going into some more detail soon.

Overall it was an interesting two days where I learnt a lot and got to meet and catch up with some of my fellow developers. Thanks to Mike Bailey and National Instruments for organising the event and I am already looking forward to next year, like I am sure most people who attended are.

I better get started on thinking of my next project.

Greg

Online Tools

I have come across two online tools over the last few weeks which I have found really useful. I normally use offline programs to edit images, create images with transparent backgrounds and create diagrams and flow charts.

Online Developer Tools

There are some times that using an offline, installed program is not possible. Some companies restrict the type of programs that are installed, especially if they are free and open source. The reason for this list that I am going to build, is to help point people to websites that work, and also as a reminder to me when I need them again and don’t have access to my browser bookmarks.

I have also listed some of the offline tools that I use which offer a lot more functionality.

UML Diagrams and flowcharts (online):

  • draw.io is a free online diagram drawing application for workflow, BPM, org charts, UML, ER, network diagrams. There is also an addon for Google Chrome which can be found here. https://www.draw.io/

Image Creators and Editors (online):

  • Free Online Image Editor is an editor where you can create your own animated gifs, resize and crop images, create images with transparent backgrounds and many other image manipulation tools. http://www.online-image-editor.com/
  • ConvertICO is a converter where you are able to convert images into application icons for desktop applications and favicons for websites. http://www.convertico.com/

Image Creators and Editors (offline):

  • Inkscape is an open-source vector graphics editor similar to Adobe Illustrator, Corel Draw, Freehand, or Xara X. What sets Inkscape apart is its use of Scalable Vector Graphics (SVG), an open XML-based W3C standard, as the native format. http://www.inkscape.org/en/
  • GIMP is a raster graphics editor used for image retouching and editing, free-form drawing, resizing, cropping, photo-montages, converting between different image formats, and more specialized tasks. http://www.gimp.org/

Project Management:

  • Trello is the fastest, easiest way to organize anything, from your day-to-day work, to a favourite side project, to your greatest life plans. https://trello.com/

LabVIEW:

  • Revert by LabVIEW Hacker is an online tool that can be used to convert vi’s to previous versions of LabVIEW. This tool is still in Beta form, but works and is really useful when you don’t have access to the latest version of LabVIEW. https://www.labviewhacker.com/revert/

General Programming:

  • Regular Expressions are a a pain to get your head around. I have found that you either get them or you don’t. I really battle trying to figure them out. I came across this website today where you can type in your string and regex, and you can see the result. I found this much easier than running the script over and over while trying to get it correct. There are many other websites that have similar tools, but I found this one to be the best to use. http://www.zytrax.com/tech/web/regex.htm#experiment

These are the ones that I have been using and have found to be really helpful lately. Please feel free to add others to the comments and I will then update the list above.

Greg

LabVIEW: Web Services Part 3

In Part 2 we had a look at connecting hardware and toggling the state on two LED’s using a form and a method VI.

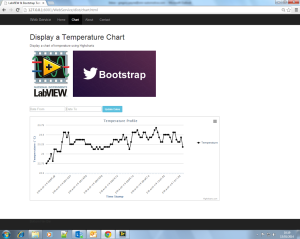
Moving to the next stage of my project, I added a DS18B20 temperature sensor to log the temperature at set intervals. This interval is defined by using a variable constant. The temperature is logged to an SQLite3 database and when queried, displays the temperature profile in a Highcharts chart in the browser. Dates to display are chosen using a jQueryUI datepicker.

Logging temperature:

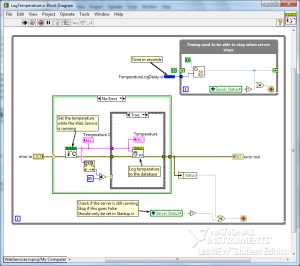
Temperature is logged every 60 seconds as set by Constants.lvlib:TemperatureLogDelay.vi. This VI is opened and run by reference from within Startup.vi when the server is started. It continues to run in the background as long as the server is running. 

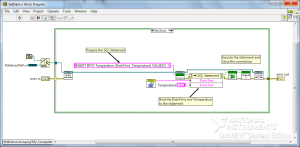
Once the temperature has been read from the LaunchPad, it is logged in an SQLite3 database. I used a library written by Dr James Powell which can be downloaded from the LAVA Code Repository

The temperature is logged alongside the current date and time. The data and time string is used to choose what date range to display in the chart.

Query the temperature:

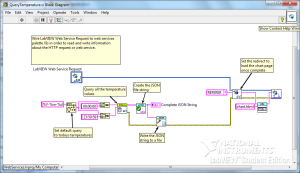
To query the database for the temperature range that we want to display, I use a jQueryUI datepicker. This gives me the dates that I want to look at and then I add the time in LabVIEW. I use a form with another GET method to pass the dates into LabVIEW and then I run the query there. 

The data gets returned from the query in the form or arrays.

Create JSON file:

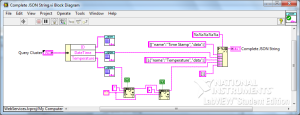
Once I have an array of dates and temperatures, I need to reformat the arrays into a JSON string which Highcharts can understand. I start off my formatting each array into the correct format string and then create the complete JSON string. 

This string is then written to a .json file which is read by the javascript to display the chart.

Adding static files:

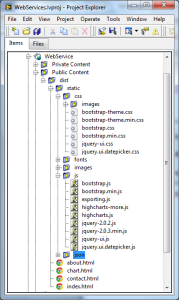
As we are using more API’s, we need to add these files to the static directories. To the static/css directory, add the jQuery datapicker theme. To the static/js directory, add the Highcharts, jQuery and jQuery datapicker js files. 

Editing chart.html:

The last thing to do is to add the <script> and html code to display the datepicker and chart. 

If no dates are selected, the today’s dates will be chosen by default.

A JSON file is then created from the query results. This file is saved into the static/json directory where it is read from within the script.

The webpage is then updated with the chart showing the temperatures for the dates selected. The settings of the chart and also the type of chart can be changed to whatever you like. Have a look at the Highcharts API for all the options. 

That is all for Part 3. You can find Part 2 here and Part 1 here. The completed project so far can be downloaded from below.

As always, comments and tips are always appreciated. 

Download LabVIEW Web Services Part 3

Greg

LabVIEW: Web Services Part 2

After making a basic webpage in my previous post, I wanted to expand on it by adding some control. I have used a TI MSP430 LaunchPad as my connected hardware.

In this version, I added two radio buttons to the main page and two normal buttons to submit the selection. I then used an html form with a GET method to pass the selection from the webpage into LabVIEW. Depending on the selection made, LabVIEW controlled the state change of the LaunchPad LED’s through VISA functions.

The following instructions add on from the project in Part 1.

Editing the html page:

Start off by adding the <form></form> code to index.html. This will allow you to send data from the webpage back into LabVIEW at the press of a button. The method being used is GET and the action points to a VI which will handle the data.

This code will create two radio buttons and two normal buttons. When a button is pressed, the status of the radio button selected and which button pressed will be sent to the VI called ToggleLED in the WebService folder.

Creating the Web Resource:

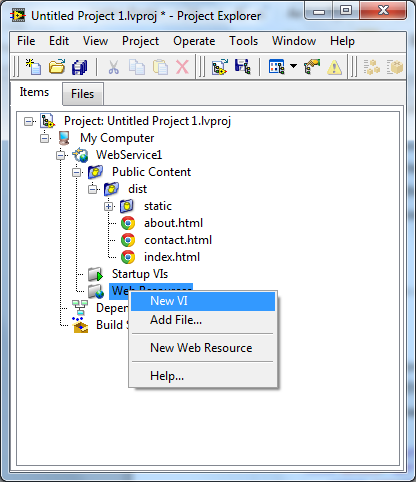
We need to create a VI which will receive the data from the form. Right click on the Web Resources folder in the LabVIEW project and select New VI.

Save this file as ToggleLED.vi in a folder called ‘Web Resources’ in the root directory and close it. We will come back to it later.

Adding Private Content:

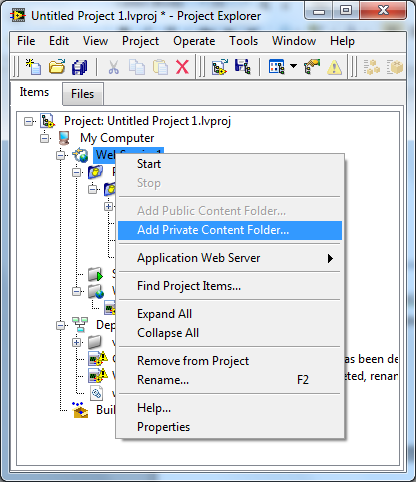
The private content that we need to add are the VI’s that communicate with the external hardware. Make a folder called ‘private content’ in the root directory. Right click on WebService in the project and select Add Private Content Folder. Navigate into the created folder and select Select Folder.

Copy over the VI’s from my download project into this Private Folder. These VI’s include the library to communicate with the LaunchPad, a Variable Constants library and the VI that sends the commands.

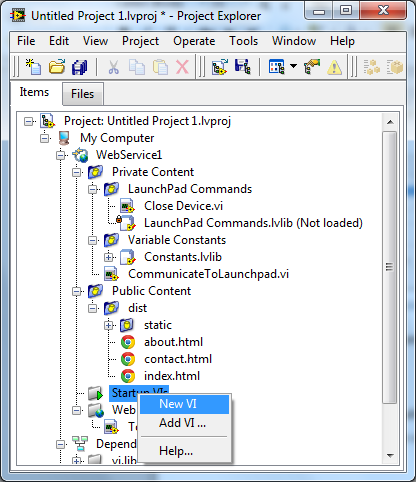
Adding a Startup VI:

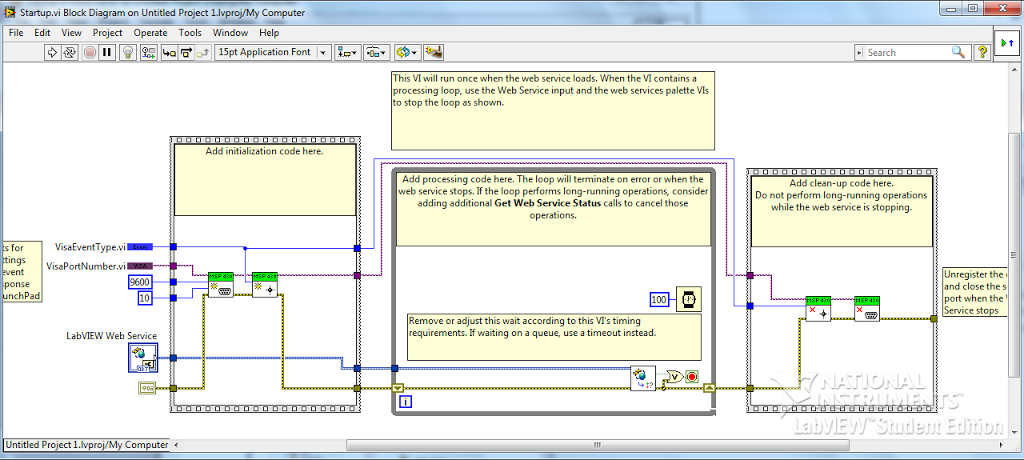
A Startup VI will run when the server is started and continue to run until the server is stopped. We will be using this VI to open and close the connection to the LaunchPad as the server is started and stopped.

Save the VI in a ‘Startup VI’ folder. Either create a new VI or copy mine and add it in the project. The VI should look like this.

Create the GET VI:

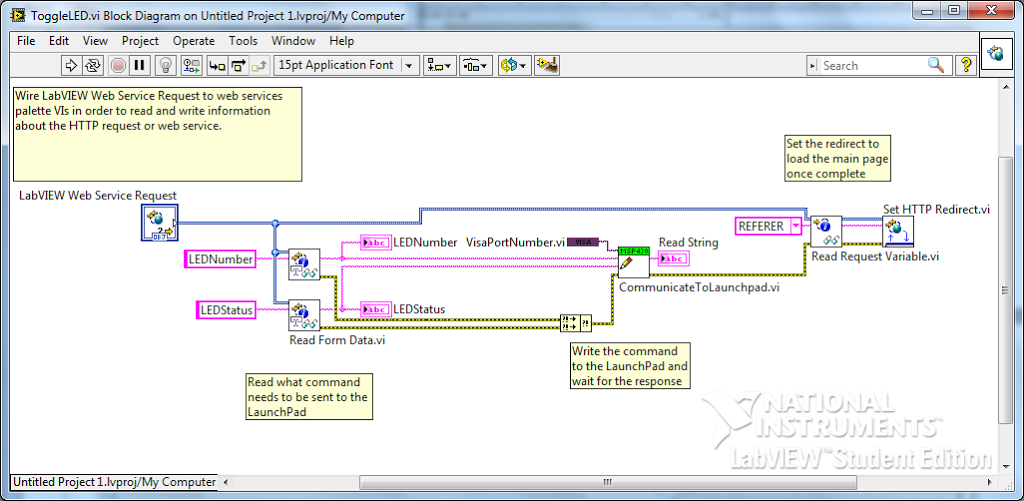
Now that we have added all the dependencies, we can go back and complete ToggleLED.vi. This VI needs to read the form data, pass the data to CommunicateToLaunchPad.vi and then redirect back to the main page.

We use the function Read Form Data.vi located in Functions>>Connectivity>>Web Services. The data is then passed into a subVI where the decision is made on what command to send to the LaunchPad. Notice that I have used a Variable Constant for the VISA Resource Name.

Once the hardware communication is complete, I redirect back to the index page. To get the original URL, use the Read Request Variable.vi function with the variable name REFERER. This will return the URL which can be passed into Set HTTP Redirect.vi.

Complete project:

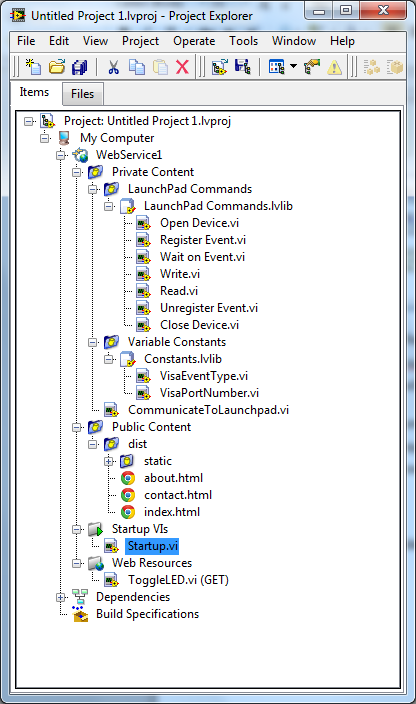
Now that we have added all the files, we should have a complete project that looks like this.

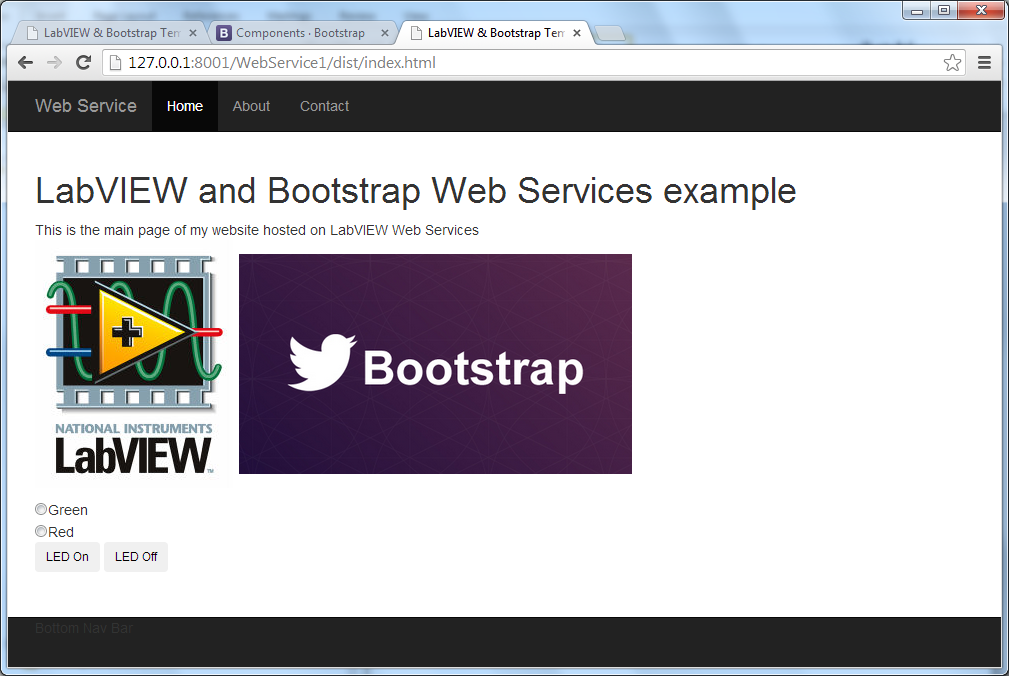
We should now be ready to test our website. Save the entire project and Start the server. Navigate to the URL and you should see the following page.

Once the server is running and the page is open in the browser, open ToggleLED.vi front panel from the LabVIEW project. Select one of the radio buttons and then press a button. You will now be able to see what commands were received by LabVIEW by inspecting the indicators in ToggleLED.vi.

I have disabled the VISA functions in the uploaded project. If you want to try them, all you need to do is remove the Diagram Disable Structures from Startup.vi and ToggleLED.vi. This will then communicate with the LaunchPad; however if there is no hardware connected, the redirect will not work and an XML page will be returned after a button is pressed. You will also need to change the VISA Resource in Constants.lvlib:VisaPortNumber.vi.

That’s all for Part 2. If you have any questions, comments or advice for me, please leave a comment below. Part 3 should be up once I have decided on what to add and figured out how to do it.

Download LabVIEW Web Services part 2

Greg

LabVIEW: Web Services with Twitter Bootstrap

I have been playing around with the updated Web Services feature in LabVIEW 2013 the last few days. My plan is to write a few posts where I create a simple website hosted by LabVIEW which can control some hardware from the browser.
 
I have done this in the past with my Raspberry Pi, but wanted to give it a go using LabVIEW instead.
 
This first post will cover how to set up the project, how to serve static pages and also how to link in third party code. The two third party products that I will be using are Twitter Bootstrap and jQuery.
 
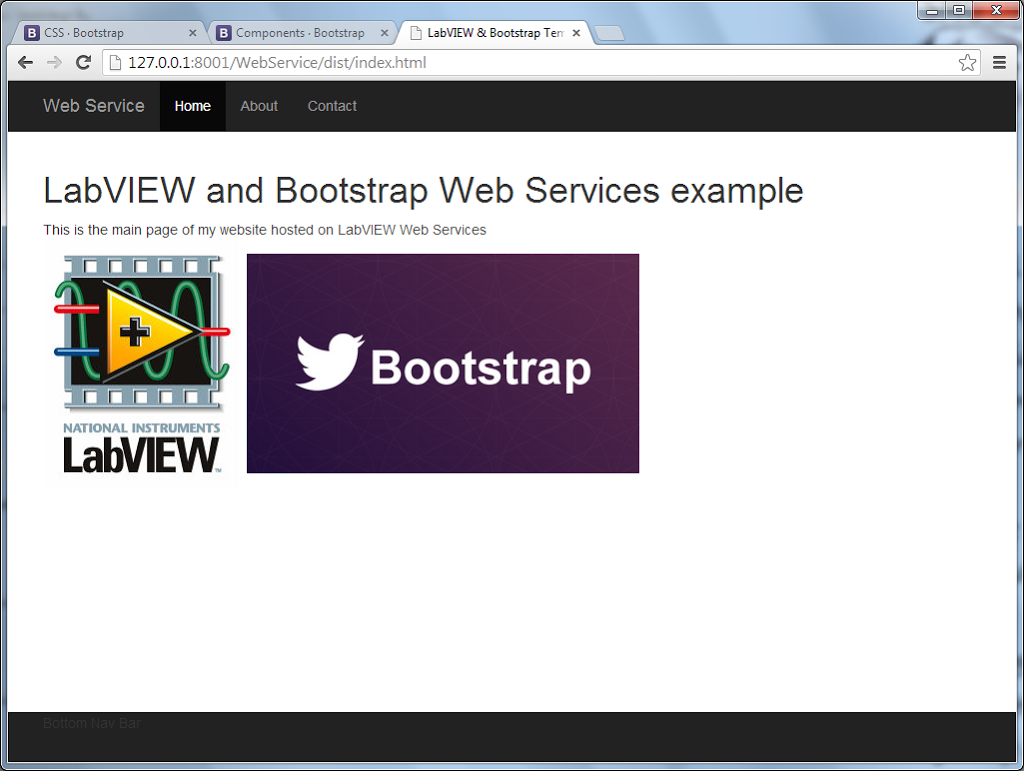
Here is the website that will be designed in the post.
 
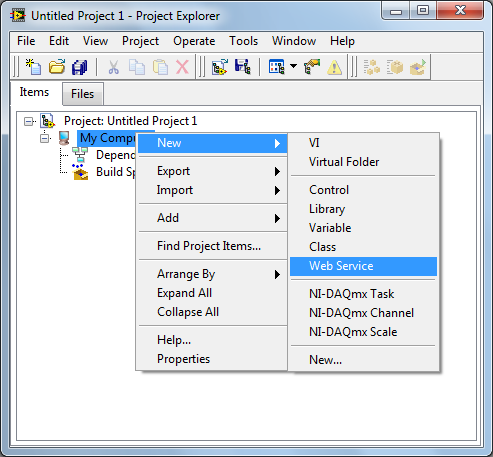
Start off by creating a blank project from LabVIEW templates. Save the project and then in the project, right click on My Computer and select New > Web Service.
 
 
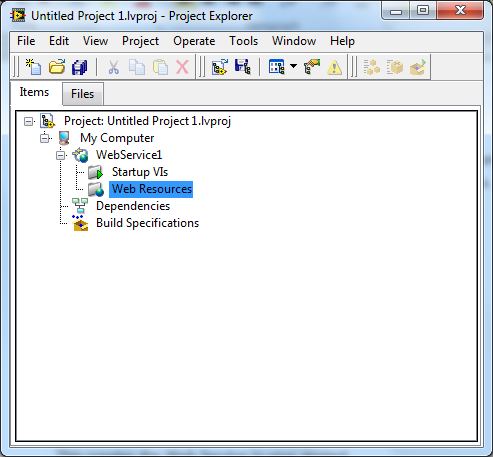
This creates the Web Service in your project.
 
 
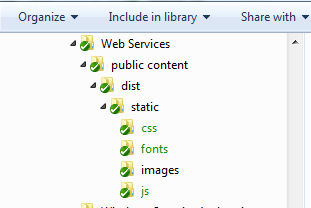
Create the folder structure in Windows Explorer for your public content. I use the following structure created in the project root directory:
 
 
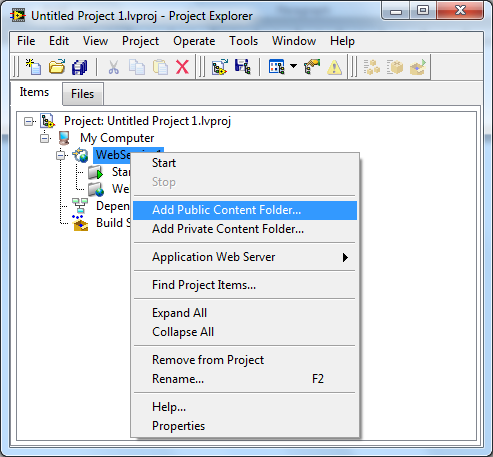
Once the folder structure has been created, it needs to be added to the project. Add the folder by right clicking on WebService in the project and selecting Add Public Content Folder. Navigate to the Public Content folder created in the previous step and click Select Folder.
 
 
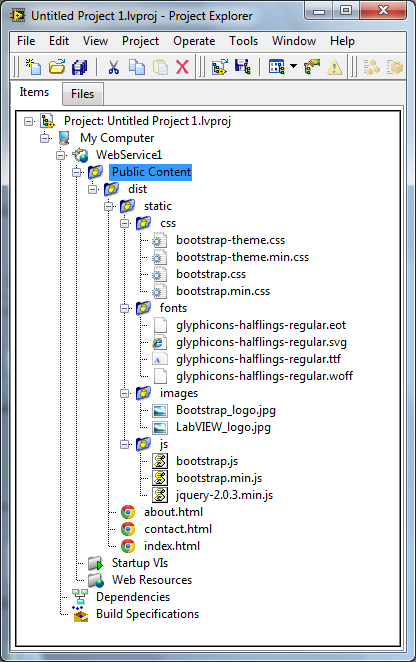
Now that the folder structure has been created, we need to add the source files. Download my project here to get the Bootstrap, jQuery, html and images that I used. Add them in Windows Explorer and they will be automatically added in the project as the folders are set to Auto Populate. Once you are done the project should look like this.
 
 
Use the Bootstrap and jQuery links above to get the latest versions if you want. Then just replace the files.
 
Open the three html files in a text editor of your choice. I use Notepad++ which I think is the best editor that I have tried. It also colours the text depending on the language used and is open source.
 
When linking to the css, js, jpg files from html, the path is relative to the html path. In this project you will use the path “static/folder/file” where folder is the type of file and file is the full file name including extension. 
 
Now that we have the files and project in place we are ready to run the server and open the webpage, but first save the project and all the components.
 
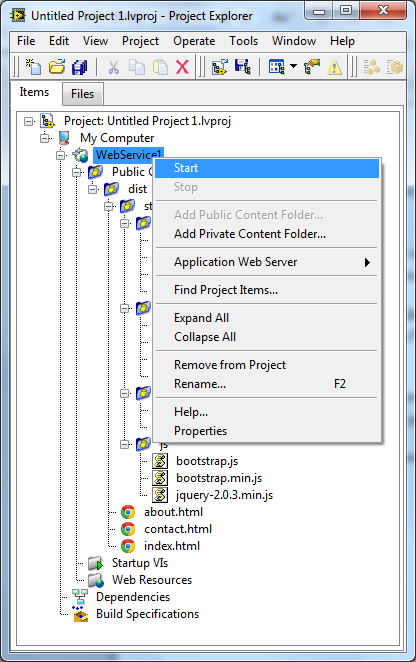
Right click on WebService and select Start. This will bring up a dialog to display that the webserver is running.
 
 
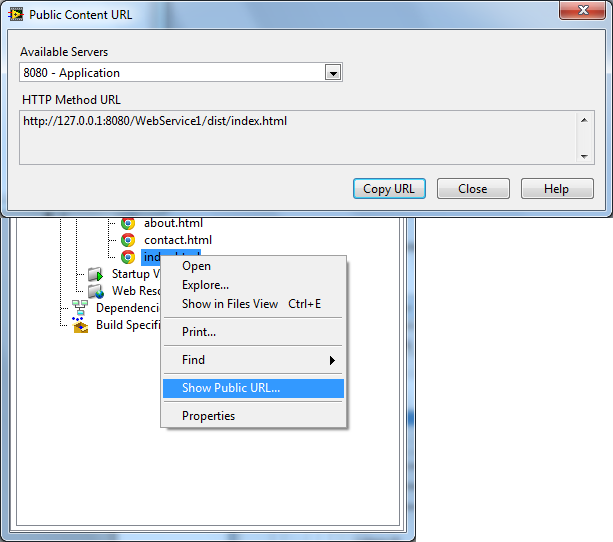
Now you need to get the URL to connect to. Right click on index.html and select Show Public URL. Copy the URL that is shown in the dialog.
 
 
Once you have the URL copied, close the dialog and paste the URL into a browser. Your webpage should now run. Once running, you can navigate between the three html pages using the links at the top of the page.
 
If you decide to change the html code, you do not need to restart the server after each change. All you need to do is refresh the browser.
 
That is it for Part 1. I will now make some changes and get Part 2 up as soon as I can.
 
If you have any comments, questions or tips for me, please leave a message in the comments section below. Thanks for reading.
 
Greg