Blog

LabVIEW Actor Framework – Linked Network Actor (LNA)

Following on from the LabVIEW Actor Framework Basics post, I wanted to continue the project showing how to use a Linked Network Actor. The Linked Network Actor (LNA) library uses network streams to communicate between Actors across a network connection. You can download the library and read all about the details over on the community page.

Either start at the beginning of the previous post, or just download the project here.

Once you have the project open, start by creating a new class, Remote Actor, and setting its inheritance to Actor.

LabVIEW Actor Framework Remote Actor Inheritance

Next you need to add the Linked Network Actor library to your project. If you used VIPM to install the library, you can find the lvlib in the following location. C:\Program Files (x86)\National Instruments\LabVIEW 2013\vi.lib\NI\Actors\Linked Network Actor

LabVIEW Actor Framework Linked Network Actor.lvlib

For your newly created Remote Actor, follow the steps in the previous post for overriding ‘Pre Launch Actor.vi’, ‘Actor Core.vi’ and ‘Stop Core.vi’. You will also need to create a launcher VI to start the Remote Actor. All these steps have been covered before and you will be left with four VIs that look as follows.

LabVIEW Actor Framework Pre Launch Init

LabVIEW Actor Framework Actor Core

LabVIEW Actor Framework Stop Core

LabVIEW Actor Framework Remote Launcher

You will now have a normal Actor that can be run from the launcher and will stop cleanly when the front panel of the Actor Core is closed.

Adding the Linked Network Actor – Remote Actor

Create a global VI which is used to define the Remote Actor identity, Local Actor identity and the IP Address of the Remote Actor. I have used a global VI in this example to keep these settings in one place, but in a proper application, these values should be saved in some sort of config file and then added in using the constructors.

Actor Framework LNA names

Now we need to create the Launch LNA VI and the Kill LNA VI. The Launch LNA VI will be run from the Remote Actor Core and the Kill LNA VI will be run from the Remote Stop Core.

In the Launch LNA VI, you need to launch an instance of ‘Linked Network Actor.lvclass’. However, before the Actor is launched, a few properties need set. Using the global VI from above, set the name to be RemoteActor, set a buffer size and a timeout. Once these properties are set, the Actor can be launched using the Remote Actor as the enquerer. Make sure to set the front panel to FALSE and wire the Remote LNA Enqueuer into the private data of Remote Actor. This enqueuer will be needed later when we want to send messages.

LabVIEW Actor Framework Remote Actor Launch LNA

Next we need to create the Remote Kill LNA VI which wraps the Send Normal Stop VI and is called from the Remote Stop Core. This will stop the Remote LNA when the Remote Actor is stopped.

LabVIEW Actor Framework Remote Kill LNA

Local Actor

Once we have the Remote LNA running, we need a local LNA that is going to connect to it. Once this connection is made, messages can be sent between Actors across a network.

Again we need to create a Launch LNA and Kill LNA VI which will be launched by the Parent (local) Actor Core and stopped by the Parent (local) Stop Core respectively. Both VIs are similar to the Remote version, except for a few additions to the Launch LNA VI.

In the Parent Launch LNA VI, we need to specify connection URL which consists of the Remote Name and Remote IP Address. Once this URL has been constructed, we can run the ‘Send Connect.vi’ which is part of the LNA library.

LabVIEW Actor Framework Parent Launch LNA

The Parent Kill LNA VI also uses the Send Normal Stop VI and is run from the Parent Stop Core.

Sending a Message

Once you have the Remote LNA and Parent LNA set up, all you need to do is create a method to run and build a message using the Actor Framework Message Maker tool. Then when you want to send a message, unbundle the LNA enqueuer and wire the message into the ‘Send Transmit Network Message.vi’. This will execute the remote method referenced in the message Do.vi.

LabVIEW Actor Framework Send LNA Message

If you need to send data as part of the message, you will be able to add the data to the message using property nodes.

Messages can now be sent across a network with ease.

As usual the working project can be found below and if you have any comments or advice, please send me an email or alternatively leave a comment on Google+. When running the program, make sure you start Remote Actor first, and then Launch the Parent Actor. It must be done this way as the Parent connects to the Remote.

Download Actor Framework LNA LabVIEW Code

LabVIEW: Tips, Tricks and Saving Time

I have been rather busy over the last few weeks at work. The inspiration for blog posts hasn’t been flowing that well so I decided to put a list of a few simple tips together. Although I have been using LabVIEW for a few years, these are things that I have only recently come across that have made my programming life that little bit easier/efficient.

Array element names:

One of the great things about arrays is that you can change the settings of on element and that change gets applied to each element inside of that array. I came across a use case the other day where I wanted each element in the array to have a specific name. Due to the nature of arrays, each element’s properties are identical, this cannot be done.

LabVIEW Array elements names_1

A way to get around this is to add a string indicator to the cluster and place it where you want the name to appear. Then when you create the array, all you need to do is specify a name for each element using a Bundle by Name function. The best string to use is a Classic >> String & Path >> Simple String and then make the background transparent.

LabVIEW Array elements names_2

LabVIEW Array elements names_3

By initialising the array first, you can name each element. You still have all the control as you would normally with the array functions, this just provides a neat way to display arrays on a front panel.

For Loop efficiency:

If you have a For Loop and each iteration does not rely on the previous iteration, there is an option which can be enabled which can speed up the execution of the entire for loop. For small For Loops this most probably will not make much difference, but when working with large For Loops which process a lot of data, you should notice a difference.

For Loop efficiency_1

By right clicking on the For Loop, select Configure Iteration Parallelism…

For Loop efficiency_2

Enable the setting and you will notice ‘P’ terminal has been added below for ‘N’. By setting this number, 10 in the above example, you are saying that instead of executing a single iteration at a time, you want the first 10 iterations to execute in parallel, then the next 10 and so forth.

Case Structure efficiency:

When I am using case structure with an enum as the selector, I always wire up my error cluster, data cluster and any other wires that are shifted between cases using the Linked Input Tunnel option. This means that whenever you create new cases within that structure, the wire automatically gets wired.

Case Structure efficiency_1

This might not seem like such a big deal, but does help when pushed for time. It is also pretty easy to forget to wire a terminal up and have to come back to it when you have a broken run arrow.

Another setting for the Case Structure selector when using strings, is to set the selector to no be case sensitive. This setting should not be used all of the time, but does come in handy in some use cases.

Case Insensitive Case Structure

Customising controls:

Controls are relatively easy to customise when you know which ones are best to use and where to start.

Start with a blank control file (.ctl) and place down the control you want to edit. I find that the best controls to edit are the Classic Controls. Below I have added a Gauge from the Classic Controls pallet.

Customising Controls_1

Click on the spanner in the toolbar and you will notice that the control gets split into its elements. I have changed the background colour so that the element borders can be seen clearer.

Customising Controls_2

By using the Tools Pallet and the paint brush, you are able to change the colour of each element within the gauge. If you want the add an image to the background, the white area in the above image, right click on the background, select Import from File at Same Size. Then select the file and it will appear as the background image.

Customising Controls_3

Once you have edited the control as you need, click on the tweezer and the control will be taken out of edit mode.

Customising Controls_4

This is a very quick and rough example, but you can now make very complex and graphical designs with the help of some image editing software to get the base images.

Quick Drop:

I have been using the basic quick drop for a while now and I know many people do use it so am not going to go into it with too much detail. One point that I would like to make is something that I only found out this week. You are able to configure the settings and also use shortcuts instead of typing the whole word of the function.

To get to the settings window, use CTRL+space to bring up the quick drop window, then select Configure in the bottom right corner of the window. Here you will be able to change the settings, add short cuts and view what all you can do with quick drop.

Quick Drop

CTRL+T is one that I found out about this week and am already using it every day.

That’s about all for today. When I think of some more tips and tricks I will be sure to update this post or write a new one if I can get a few more. The vi’s that I have used in the above examples can be found below.

If you have any comments, tips or advice, please send me an email or leave a comment on Google+ as I have disabled comments here to try and control spam.

Download Tips and Tricks LabVIEW Code

Greg

LabVIEW Actor Framework Basics

I have tried a number of times over the last year or so to get my head around the Actor Framework in LabVIEW. I started by reading the recommended starting point and went through all the examples, templates and hands-on. After trying a number of times, unsuccessfully, I put it to one side for another day.

My two main stumbling points, I felt, was not having a project to implement the framework in and not really knowing where to start. All the examples that I worked through started with a relatively large project and I could not find an example that starts with an empty project and builds up from there.

Last week a colleague explained the basics to me and over the last two weeks I have been working on a large project using the Actor Framework. I am finally getting an understanding of it and seeing the potential power in using the framework. Below is an example/tutorial on how to start from an empty project.

Recommended reading

Now for my example

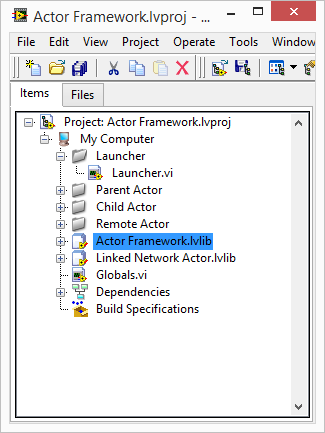
Start off with an empty project and add three virtual folders named, Launcher, Parent Actor and Child Actor.

LabVIEW Actor Framework empty project

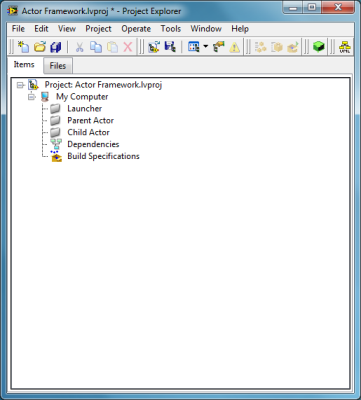
  • Launcher: Main vi which is used to start the program. Launches Parent Actor
  • Parent Actor: Main Actor which will launch Child Actor
  • Child Actor: Another Actor that can do things

The Parent Actor and Child(ren) Actor(s) will be created in a similar way. The main differences are the way in which they are started. I will explain how to create the Child Actor and then only show the differences in creating the Parent Actor.

You need to add Actor Framework.lvlib to your project. This is needed so that the classes we are going to create can inherit from Actor.lvclass. Actor Framework.lvlib can be found in C:\Program Files (x86)\National Instruments\LabVIEW 2013\vi.lib\ActorFramework\.

Child(ren) Actor

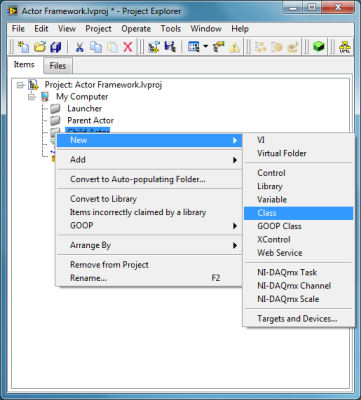
Create a new Class inside the Child Actor folder and save it.

LabVIEW Actor Framework Child Class

Create virtual folders called Messages and Framework Overrides.

LabVIEW Actor Framework Child Class 2

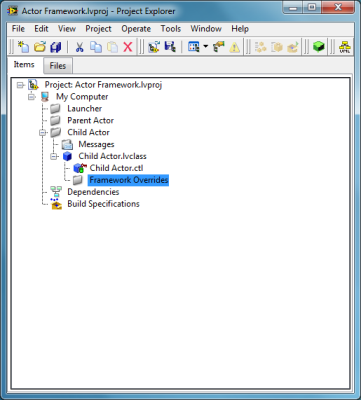
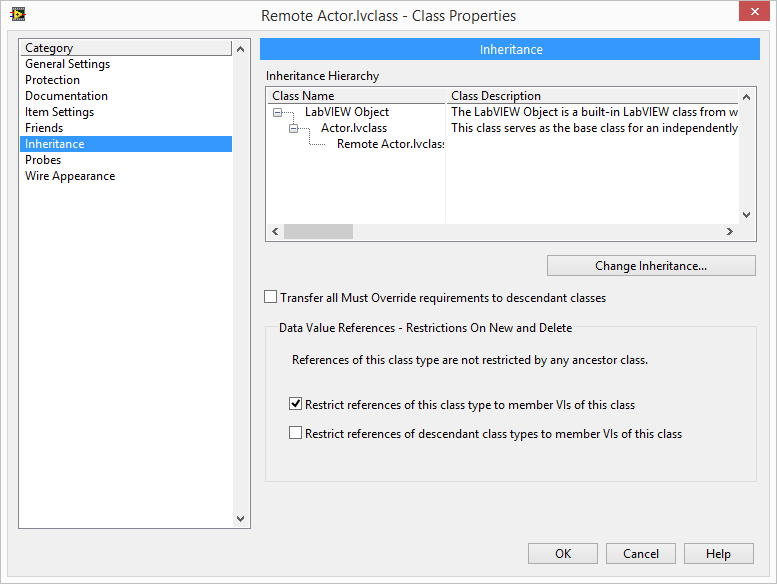
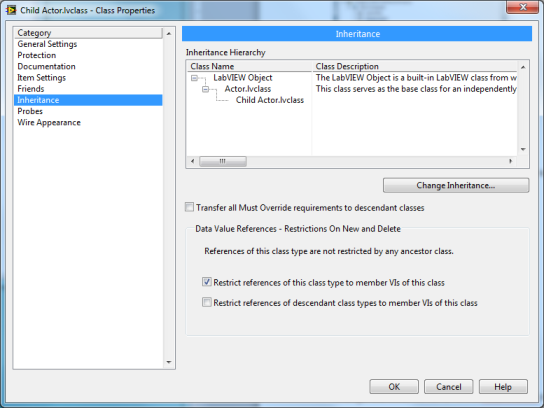
Change the inheritance of Child Actor.lvclass to inherit from Actor.lvclass.

LabVIEW Actor Framework Child Class Inheritance

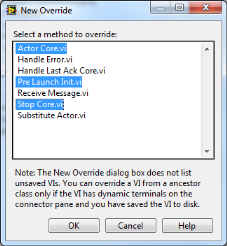
Create three vi’s that override the Actor Core, Pre Launch Init and Stop Core. Pre Launch Init will be used to create a string notifier and Stop Core will be used to clean up the notifier. These vi’s are called before and after Actor Core is launched and stopped respectively. Actor Core will be the main vi that is run. This is where your Actor’s functionality happens. Save these vi’s and add them to the Framework Overrides folder in the project.

LabVIEW Actor Framework Override

Follow the following steps to be able to stop the Child Actor when Actor Core is closed.

Child Actor.lvclass:Pre Launch Init.vi

  • Create a notifier with an empty string for the data type
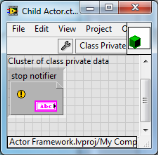
  • Use the notifier out terminal to create a control, rename it stop notifier and then move it into Child Actor.lvclass private data cluster.
  • Bundle the notifier out into the Child Actor object

LabVIEW Actor Framework Pre Launch Init

LabVIEW Actor Framework Private Data

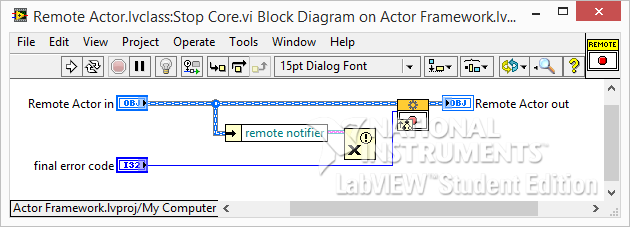
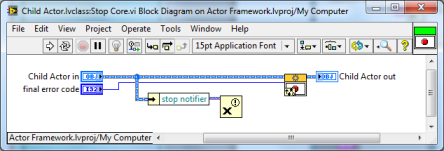
Child Actor.lvclass:Stop Core.vi

  • Unbundle the stop notifier from the Child Actor object
  • Release the notifier

LabVIEW Actor Framework Child Class Stop Core

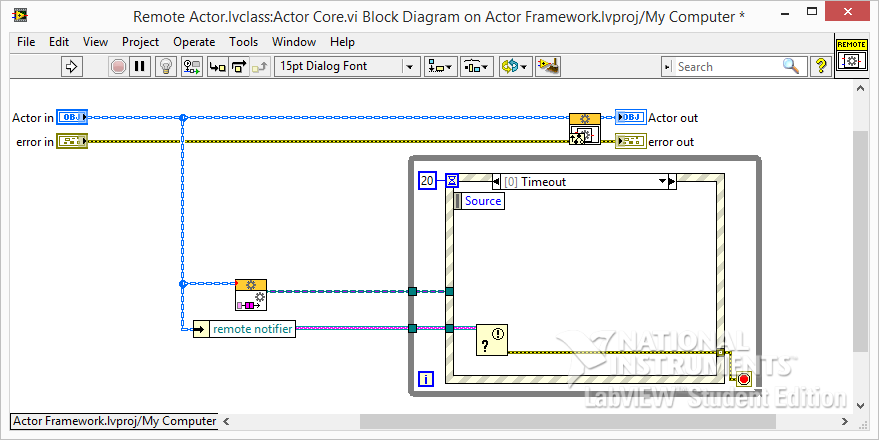
Child Actor.lvclass:Actor Core.vi

  • Create a while loop and an event structure inside with a 20ms timeout
  • On timeout, add a Get Notifier Status and wire the error cluster to the while loop stop terminal
  • Unbundle stop notifier from the Child Actor object and wire the notifier into the Get Notifier Status vi
  • This monitors the notifier every 20ms and when it is released in Stop Core, it will stop Actor Core. This is one of many ways that can be used to stop the Actor.
  • Add an event for Panel Close?
  • From the Actor Framework functions palette, place the Read Self Enqueuer outside the while loop and the Stop Actor inside the Panel Close? event.
  • Wire the Child Actor object to the Read Seld Enqueuer and the Self Enqueuer to the Stop Actor.

LabVIEW Actor Framework Child Class Actor Core

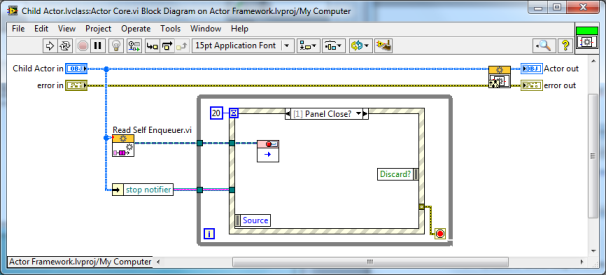
The Read Self Enqueuer vi gets the queue for itself. So what is happening here is the Stop Actor vi is being run on the Actors own queue which will call Stop Core, release the notifier and then stop the entire Actor.

Next, create the Parent Actor using the same steps. Once complete, add the following modifications.

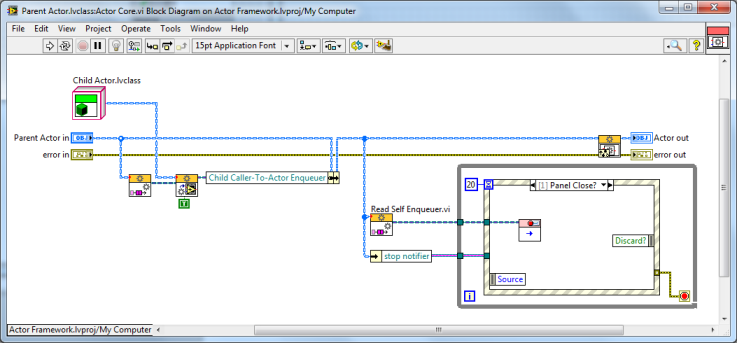
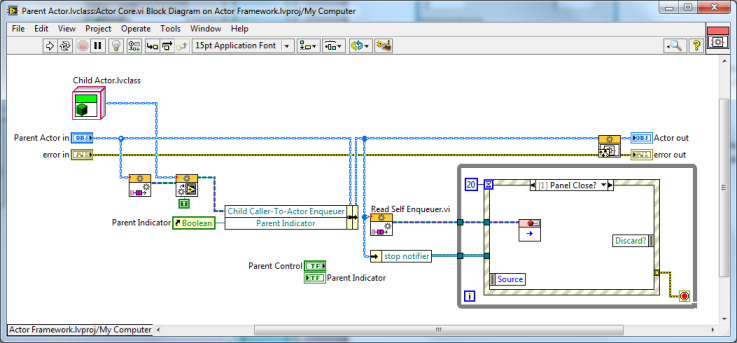
Parent Actor.lvclass:Actor Core.vi

The Parent Actor will be responsible for launching the Child Actor. To do this we need to:

  • Add the Launch Actor vi with the Read Self Enqueuer defining which queue to execute on.
  • Add a control of the Actor’s enqueuer to the Parent Actors private data and bundle it into the Parent Actor object.
  • Drag the Child Actor.lvclass from the project window onto the Parent Actor Core block diagram and wire it into the Launch Actor vi.

This will now launch the Child Actor before running the Parent Actor core. Make sure that if you want to show the front panel of the Actor being launched, you need to set the Open Actor Core front Panel? To TRUE as the default is false.

LabVIEW Actor Framework Parent Class Actor Core

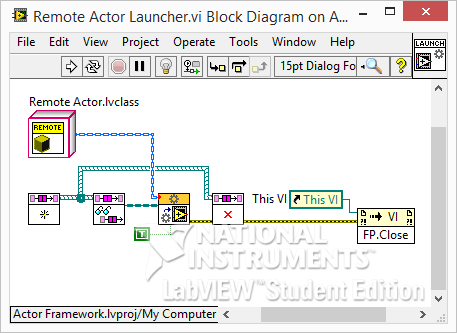
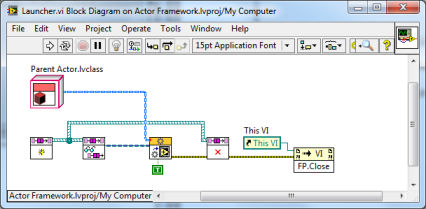
Creating the Launcher to start the Parent Actor

  • Create a new vi in the Launcher folder and name it Launcher.vi
  • You first need to create a queue for the Actor Core to be launched on.
  • Then Launch the Actor by wiring in which class you want to launch. In this case we wire in the Parent Actor class
  • Then release the queue and close the front panel. You can make fancy launchers with splash screens, but this one is just a plain vi with an empty front panel

LabVIEW Actor Framework Launcher

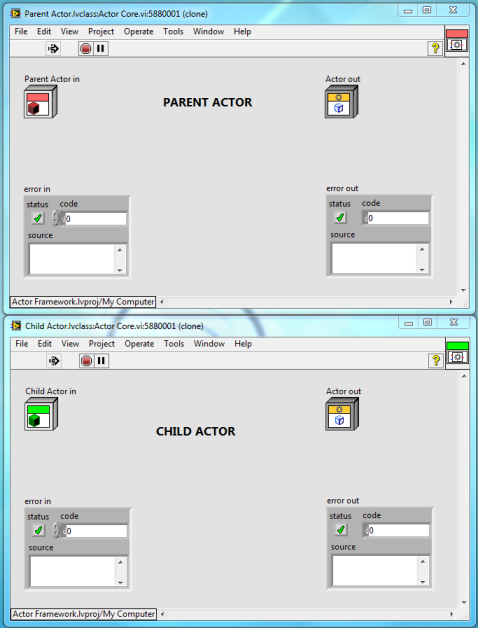
You should now be able to run the launcher which will start the Parent Actor. The parent Actor will then start the Child Actor. When you close the two Actors, they should stop cleanly. If this works then we can carry on. If not, go back and make sure that you are releasing all the notifiers and queues.

LabVIEW Actor Framework Cores running

Communication between Actors

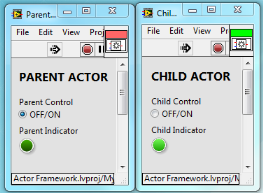
Add a Boolean control and indicator to the Parent and Child Actor Core. Setting the control in the one Actor will set the indicator in the other Actor. This will show the basics of sending messages between Actors.

Parent to Child Actor

You need to add references to both Actors for their respective indicators. We will use these references to get and update their state from other vi’s with the class. You also need to add a reference control to the Parent and Child class private data.

LabVIEW Actor Framework Parent Class Actor Core_2

LabVIEW Actor Framework Parent Class Actor Control

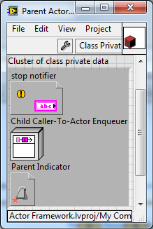
Make sure you add references to both the Parent and Child Classes.

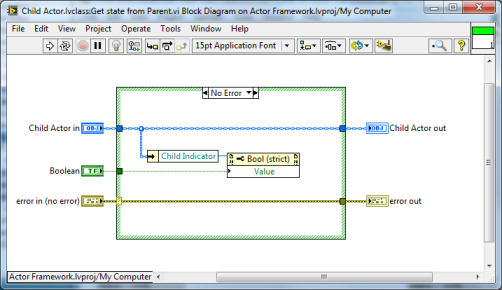
We now need to create a method (vi) in the Child Class that is going to change the Child indicator when told to do so. Create a new VI from Static Dispatch Template in the Child Class. Save it with the name Get state from Parent.vi.

Add a Boolean control to the front panel and connect it to the connector pane. In the block diagram, unbundle the indicator reference, wire it into a property node and then write the Boolean state to the value property.

LabVIEW Actor Framework Child Class method

This vi is the method that does the work of changing the Child Actor front panel indicator. We now need a way to be able to run this vi from the Parent Actor. There are some tools that allow us to create these messages really easily.

From the project window, select Options and then Actor Framework Message Maker. This will open a window and allow you to create messages for methods that are in your project. Select the method that we just created and click Build Selected.

A Get state from Parent Msg.lvclass is created with two vi’s. Close the vi’s and move the class to the Messages folder within the Child Actor.

LabVIEW Actor Framework Project with Child Actor message

The Send Get state from Parent vi is used to add the data to a queue and the Do vi calls the method that we created a step back. I am not going to go into the details of these vi’s but feel free to open them and see what is going on.

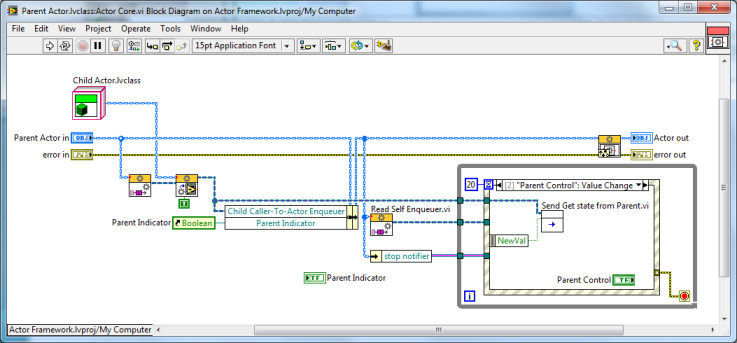
Now that we have our Message and our method, we need to go back to the Parent Actor and to define when to execute this message.

In the Parent Actor Core, add an event case to handle a value change from the Boolean control. This is where we will send the state to the Child Actor message. Add the Set Get state from Parent vi to the event case. This will put the Boolean control state onto the queue of the Child Actor. The Do vi will then be called which will then run the method from within the Child Actor Class. This will then update the front panel indicator of the Child Actor.

LabVIEW Actor Framework Parent Class Actor Core_3

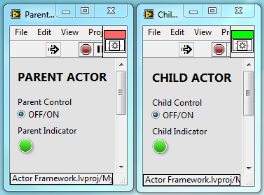
Save your project and run the Launcher vi. Notice that changing the control on the Parent Actor, changes the indicator of the Child Actor.

LabVIEW Actor Framework Cores running_2

Child to Parent Actor

Now repeat the process to send the state from the Child Actor up to the Parent Actor.

  • Add a method to the Parent Actor Class writing the state to the indicator reference
  • Create the messages using the Actor Framework Message Maker tool
  • Add an event case to the Child Actor to handle the state change
  • Wire the control into the Send Get state from Child vi
  • Wire in the queue. You now need to get the caller enqueuer and wire that queue in.
  • Save the project and it should now work

LabVIEW Actor Framework Cores running_3

The final project should like something like this.

Actor Framework Final Project

You are now able to send states both ways between the Parent and Child Actor.

I used these points to get a better understanding on how the Actor Framework works:

  • The main program of an Actor is the Actor Core that is overridden from the base class
  • Each Actor has its own queue
  • Use the Actor Framework Message Maker tool to create messages to communicate between Actors
  • Use the Read Self Enqueuer vi to get an Actors own queue
  • Use Read Callers Enqueuer vi to get the queue of the Actor that Launched it
  • Think of each Actor as its own process with a queue. To speak to a specific Actor, create a message and tell it which queue to execute on

It took me a week or so to get my head around what goes on. I still have a way to go but am getting there and the more I use it, the more confident I am getting. This is a very basic example but I feel it’s good to get going and to understand the framework without starting with a large project.

I have gone into detail with some of the above steps and breezed over others. I hope I have made the most important steps clear enough. If you are stuck with anything, please leave a comment and I will try help as much as I can. You can get a copy of the entire working project below. It has been written in LV2013 SP1.

Thanks for reading and I hope that I have been able to clear the fog over Actor Framework for some people.

Download Actor Framework LabVIEW code

Greg

Using Alpha Colours in LabVIEW

I have been playing with LabVIEW Vision Development Module a bit over the last few months. I have an idea for a project that tracks the movement and vibrations of an object. Using a standard 24 bit RGB colour works, however if the same x;y coordinate is passed over more than once, visually it is difficult to see what is happening.

While making drawings in Inkscape, I am able to change the opacity/alpha level of a colour. This adds an extra 8 bits onto the colour, making it a 32 bit RGBA colour. According to Wikipedia:

The alpha channel is normally used as an opacity channel. If a pixel has a value of 0% in its alpha channel, it is fully transparent (and, thus, invisible), whereas a value of 100% in the alpha channel gives a fully opaque pixel (traditional digital images). Values between 0% and 100% make it possible for pixels to show through a background like a glass (translucency), an effect not possible with simple binary (transparent or opaque) transparency. It allows easy image compositing.

RGBA Colour Palatte

The above image, made in Inkscape, indicates how many dots with an alpha level of 0x2D, gets a more intense colour the more layers are added on top of each other. My project idea will then use this concept to show a type of intensity map.

I ran into my first problem when using the standard LabVIEW 2D Picture. From what I have seen, this is the only indicator in the standard LabVIEW package where you can display and draw pictures. This works well, and I have used it before, but only 24 bit RGB colours can be drawn. Even if you import a png image with alpha colours, they will be lost when displaying the image in a 2D Picture.

This led me to look at other ways that images can be displayed and drawn in LabVIEW. I decided to try using a .NET container with a System.Windows.Forms PictureBox.

LabVIEW .NET container - picturebox

I have used Windows dll’s before and they have generally worked quite well, obviously only on Windows machines. The main problem that I find is getting the versions correct and also finding the methods and properties that you want to use, as the libraries are usually very large. To get around this I turned to some C# and VB examples to see where to get started.

My aim was to get the concept working so that I can use it in a bigger project. I used my mouse cursor position to to draw many filled circles that follow the mouse. These were the steps that I followed:

Add the .NET Container to the front panel and insert a PictureBox control:

I made the container fill the pane so that it was easier to get the mouse position relative to the panel. The PictureBox can be found in the System.Windows.Forms class.

Create a new bitmap the same size as the PictureBox:

It is good practice to create a bitmap inside the PictureBox and then do all your drawing onto the bitmap. This makes saving and clearing the image a lot easier. Once the bitmap is created, add it to the PictureBox as an image. The bitmap can be found in the System.Drawing class.

Create the SolidBrush that we will use to draw the filled circles:

This is where we can define the colour (RGB) as well as the alpha level. Color and SolidBrush are both from the System.Drawing class.

One top tip to remember, when looking for the colour property and method, remember to spell it color and not colour. Windows is American so the spelling can catch you out.

Once you have defined the brush, you can start to draw onto the bitmap using the System.Drawing.Graphics class. In this case, I chose to draw a FillElipse (filled circle), but you can choose one or more of many different drawing tools.

I ran this in a while loop so that I could draw many circles and then when I stopped the application, I called the Bitmap.Save method and saved the bitmap as a png image. By saving it as a png image, you will keep all the alpha colours. The slower you move the mouse, the close the circles are together which implies that the circles are darker, more layered on top of each other.

LabVIEW alpha opacity colours

You can see that I also added a date and path to the image. This is what the image will look like in the .NET PictureBox. If you import the same image into LabVIEW using the Read PNG File function, you get this:

PNG in LabVIEW 2D Picture

As you can see, all the alpha colours have been lost. You can set the alpha level threshold so that anything above that level is set to its equivalent solid colour.

So although it is a bit more work to get the PictureBox working and set up, it is much better to display 32 bit images.

If you want to have a look at the code, please feel free do download it from below. As I mentioned earlier, versions might play a role in the vi working properly so I have developed this using LabVIEW 2013 on a Windows 8 machine.

If you need any assistance or have any tips, please leave a comment and I will get back to you.

Download Alpha Colours LabVIEW code

Greg

Raspberry Pi, Camera and Dropbox

Over the last few months I have been preparing my project and presentation for the UK CLD Summit. Now that the CLD Summit is over, I wanted to do a quick and fun project on my Raspberry Pi that has been lying in a box for those few months.

Something that I have wanted to do for a while is get a webcam working and be able to take pictures. I don’t have the Raspberry Pi camera, so just used a normal webcam. I used the Logitech C170 connected directly to the USB port of my Raspberry Pi and it worked really well. The other USB port has a WiFi dongle connected.

Raspberry Pi Camera Dropbox

I have this connected up and looking out my window so please excuse the lack of quality.

So to get started, make sure your Raspberry Pi has been updated. I have used the standard Rasbian image.

apt-get update
apt-get upgrade
rpi-update

Setting up a webcam:

Then you need to install fswebcam

apt-get install fswebcam

Once all the above has been installed, plug your webcam in and reboot. Make sure that your webcam is seen by the system.

lsusb
Bus 001 Device 005: ID 046d:082b Logitech, Inc.

There are many switches and options available, so I will explain what I used and how to get a full list. Run this command to capture an image.

fswebcam -r 640x480 -S 10 -d /dev/video0 webcam.png

fswebcam

  • The program that is being executed

-r 640x480

  • Setting the resolution for the image

-S 10

  • Skip the first 10 captures. With my webcam, if I save the first image captured, it gets corrupted. So by adding this option, the camera takes 10 images and only saves the last one.

-d /dev/video

  • This sets the device name. To get yours, execute ls /dev/ and look to see what your device is called

webcam.png

  • This is the file name of the saved image

By executing fsweb -h, you can see all the options.

You will now have the image saved to the location of your choice. If you are running headless like I do, you have no idea if the image is correct. You could FTP into your Raspberry Pi and get the image off, or like I have done, link my Raspberry Pi to my Dropbox account.

Linking a Dropbox account:

 It took me a few attempts to get my Raspberry Pi and Dropbox account linked, but got there in the end.

First you need to download the Dropbox_Uploader script from git. I then copied the script file to the folder where I am saving my pictures to. You don’t have to do this, however it saves writing full paths when executing the commands.

Once the script is in the location you want it, you need to make it executable.

chmod +x dropbox_uploader.sh

Make sure you have a Dropbox account before executing the script. Once you have an account, then you are ready to start linking the two. Run the script and follow the prompts.

./dropbox_uploader.sh

The settings that I used when setting up my App were:

  • Files and Datastore
  • No – My app needs access to files already on Dropbox
  • All file types – My app needs access to a user’s full Dropbox
  • Add a unique name, you might need to try a few

Verify your app and if successful, you will notice a folder called Apps has now been created in your Dropbox account. I had to wait a few minutes for this to update.

Test if your account has been linked properly by getting a list of folders in your account.

./dropbox_uploader.sh list

If this works, you are ready to start uploading your images.

./dropbox_uploader.sh upload image.png /Apps/App_Name/File_Name

Wait a few seconds and the image should appear at the location you uploaded it to. Now you can see if the image you captured in the previous steps has worked.

Here is a time lapse video that I put together using Windows Movie Maker. I set up a cron job and ran a script every minute.

If you have any questions, please leave them below in the comments and I’ll try help where I can.

Greg