Blog

Raspberry Pi: MCP23008 Port Expander

I have been wanting to get an MCP23008 I2C port expander connected to my Raspberry Pi for quite a while. I finally got one and during my breaks from LabVIEW CLD exam preparation, made the circuit on some strip board. 

Using the Quick2Wire Python I2C library makes getting this working really quick and easy. Just make sure you place your LED’s the correct way around. I spent a bit of time debugging the I2C until I thought of checking the obvious. 
Currently I only have the outputs working as I didn’t have any switches with me. I’ll add two switches and get that going next. 
Here is the code that I used. I set up a little menu to select which LED to turn on or off. 
Next I plan to get the software PWM working so that I can connect up to Cheerlights. Need to do some more studying and then will get that going. Also need some RGB LED’s first.
Until next time, happy coding.
Greg

A week of LabVIEW courses at National Instruments

Last week I sat my first two LabVIEW courses. I have been wanting to do some courses for a long time but have never really had the opportunity. Fortunately as I am not working at the moment, I got the time to do them. As I did my CLAD exam a few months ago, I decided to to LabVIEW Core 3 and LabVIEW Connectivity.

LabVIEW Core 3 was on Monday to Wednesday and then LabVIEW Connectivity was on Thursday and Friday. The week was really packed in, but the amount of hands-on time kept us busy and focused.
Over all I got more out of Core 3 and will definitely be using many of the concepts in my future programs. I have also thought back to some of my first programs and realised that I could have made them so much better in many ways. I am planning on doing my CLD exam around August so will be going over many of the topics in my practice programs. 
I found Connectivity a more fun course where we learnt how to use many network tools and tools to include shared libraries from .net and many other programming languages.
The examples that you work through for both courses are very in depth and explain the concept being taught very well. The instructors that lead the course are very knowledgeable and helpful about the course subject  and other questions and topics that arise during the discussion periods. 
I highly recommend taking one or many courses that NI offer as this is a great way to learn quickly. The learning curve that I went through a few years ago when I learnt LabVIEW by myself would have been drastically shortened had I done some courses sooner. 
Go on, give your NI representative a call and book a course today. You will not regret it one bit.
Greg

Raspberry Pi temperature profile using LabVIEW

Connected to my Raspberry Pi is a DS18B20 temperature sensor which I have mounted inside the case roughly above the processor. I wanted to map the temperature profile inside the case and have a visual representation of it. To do this I joined up a Python script, an SQLite3 database and LabVIEW.
I only have one temperature sensor connected and the RasPi doesn’t run very warm so this image is rather exaggerated. I’ll explain a bit more later.
So I started off by writing a Python script that runs on my RasPi. It measures the temperature and then logs it to a SQLite3 database that I store in a shared folder on a mounted USB flash drive. I have accelerometer data in the database too, but that will be added a bit later.


That is all that happens on the RasPi. Next I wrote a LabVIEW program that queries the database over the network to get all the data. I need to do a bit of work on my query to just return the last line of data but that I’ll add in future versions.
To query the SQLite3 database, I used the this toolkit which works really well and is super simple to get set up. Once I have the temperature, I need to display it on in user interface. This is where Sensor Mapping Express VI comes in really handy.
All you need to do is point to your .stl file and select where you want to the temperature sensors to sit on the RasPi. I used this model which I converted using Google SketchUp. This is where I had to use four dummy senors to be able to show the temperature difference. I have set the outside 4 sensors to 0 degrees Celsius and only sensor 0 is getting the temperature from the database. With more sensors this can be made a lot more accurate. As I said earlier, this is just to prove a concept for now.
Every 100ms I query the database, build an array with the temperature data and then apply it to the Sensor Mapping Express VI. The temperature profile then changes according to the surface temperature of the RasPi.
Here are the colours that I used for my mapping:
Temperature vs Colour mapping:
0 Celsius R-0 G-0 B-255
21.25 Celsius R-0 G-255 B-255
42.5 Celsius R-0 G-255 B-0
63.75 Celsius R-255 G-255 B-0
85 Celsius R-255 G-0 B-0
I have already connected up an ADXL345 accelerometer which is acquiring tilt and pitch values, so my next step is to be able to move the  model in LabVIEW as I move my physical RasPi. Should be some fun for a few more hours.
If you want a copy of my code, you can grab it over below.
Please feel free to leave any tips, comments or questions below.
Greg

Route static files for BottlePy web framework

I have been using BottlePy on my Raspberry Pi for quite some time. I really like the simplicity of the framework and the ease at which you can get something up and running. The one issue I had, was that you could not load static css or js files. 
There are ways around this, like placing your files in Gist and linking to the raw code, but this can be an issue when you want to run your webserver ‘offline’. The documentation is not very clear on how to do this, so here is what I did to get it working properly. 
This is the template that I use to route the static files. This is part of my main python code that runs the server.
Then all you need to do is add your file names in the .tpl file. By doing this, your css, or js files can be stored locally so they can still be served if you are offline. 
That is about it. I hope this helps because I really find this framework great to use and works flawlessly on my Raspberry Pi.
Greg

Source Control for LabVIEW using TortoiseSVN

For a long time now I have been using LabVIEW, but I am not very diligent at using source control. Source control is one of those things that you never really need until it’s too late. So this weekend I decided to install TortoiseSVN on my laptop to start out small, but get into the habit of backing up and recording the changes I make to my code. 
To get up and running is rather easy. Go over to TortoiseSVN and download the install file. Once installed, you are ready to get going. 
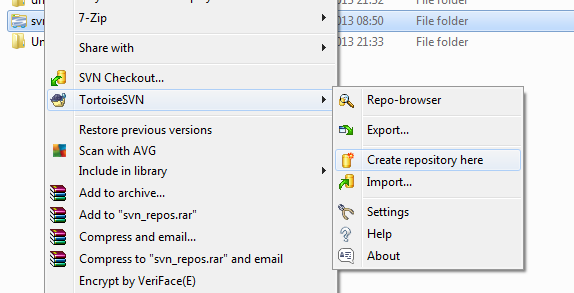
The first thing to do is make a folder somewhere to store your repository. I called mine svn_repos. Now right click, you will see an option for TortoiseSVN. Select the Create repository here option from the drop down menu. 

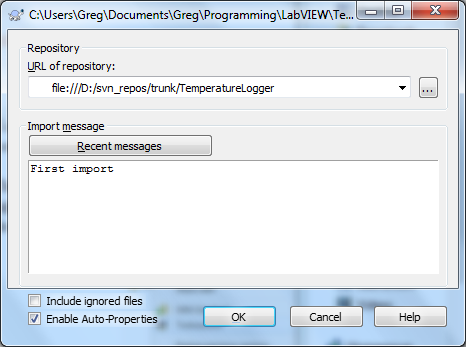
Once you have created the repository, go over to the folder that you want to back up. Right click on the folder and select the import option under the TortoiseSVN menu. A window will pop up where you need to enter the path and details of the change. My folder name is TemperatureLogger so just change that in the path to suit your folder.

Press OK and all the files in that folder will be backed up.
Now you need to get a  working copy. I use the same folder but you can select any folder for your working copy. Right click on the folder that you have just imported and select the SVN Checkout option. Select your path and if it is the same path you will get a warning. Click OK and when the checkout is complete, you will notice that there is a green tick icon over the folder. When you make any changes to the files, that green icon will turn red.
The LabVIEW part is to now install the JKI Toolkit for TortoiseSVN. Firstly you need to install the VI Package Manager. Once installed, search for TortoiseSVN in the user interface and install it. This takes a couple of minutes and needs your input for a few of the steps.
Once everything is installed, open one of the files that you previously imported and checked out in LabVIEW. Make any change and then save it. You will now notice that there is a red icon over the files that have been changed. 

In LabVIEW, go to tools > TortoiseSVN > commit. 

Here you will be given the option to add a comment for the changes that were made. This helps you track your changes over time.

You will now notice that icons over the files are back to green letting you know that you have backed up all your files.

You can also get these options directly from Windows Explorer, but it is really convenient to have the option to back up your work directly from LabVIEW. There are many more tools to be used and they are explained pretty well in the documentation.
Well I hope this helps you start to back up and document the changes that are made to your programs. Please don’t forget that this can be used for any type of files, not just in LabVIEW. All you need to do is right click on the file or folder and choose the option under the TortoiseSVN menu.
Greg