Modifying an applications priority

By default, Windows runs applications with their priority set to Normal.
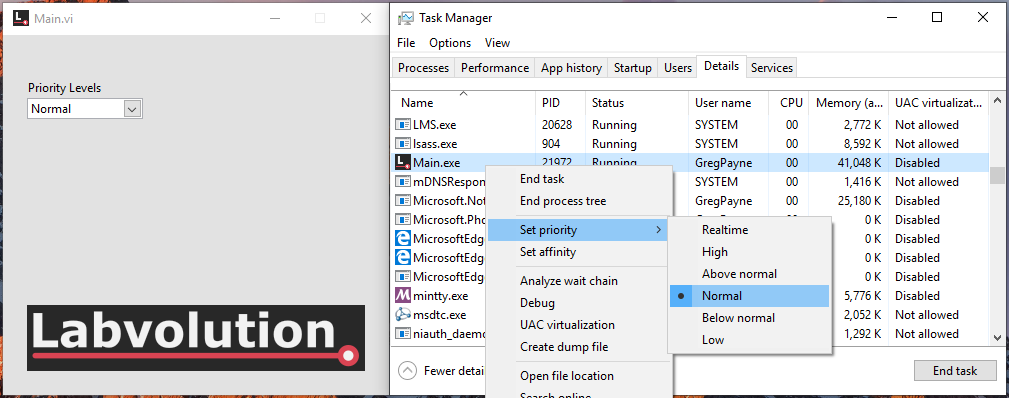
Changing this priority cannot be done from the LabVIEW build. Therefore, if an application needs to run with a specific priority, the priority needs to be manually changed each time the application is run.

This can be tedious as well as very easily forgotten about. Additionally, if a Realtime priority is required, an administrator account is needed.

There is a way to change the priority of an application using the Windows Management Instrumentation Command line (WMIC) utility.

wmic process where name='<application.exe>' CALL setpriority '<priority>'

Priority LevelPriority Value
Realtime256
High128
Above Normal32768
Normal32
Below Normal16384
Low64

I have written a utility that can be run when starting an application which will set the priority automatically. As mentioned earlier, when setting a Realtime priority, the command needs to be run as an administrator.

Demo video changing the priority of an application.

I have only tested this on Windows 10 but should work on earlier versions. A demo application can be found here.

Update

I have been asked by a few people in the LabVIEW community if changing the priority for an application really makes a difference. Although I hadn’t done any benchmarking, from viewing the results from our particular application, I could say that it did make a difference; however I couldn’t prove it.

I therefore made a benchmarking application that simulates the way we are capturing data and why it is important to us to set the application priority. I can’t go into the details of the application, but here is a brief, simplified overview.

Application Overview

The application is running on a Windows 10 laptop and the system under test runs at a fixed speed (meters/min). Measurements are then taken at a fixed rate (dt). The measurement is recorded with an associated ms time. We need to capture a measurement at least every 5ms and
the distance is updated at a rate of around 1sec. The test will run for anything from 30 min to 3+ hours. In the post processing, we match time to distance and interpolate the missed distance measurements.

We had very short deadlines and all the equipment had been specified and purchased before I started the project. This introduced limitations which we had to work around; at least for this initial get-it-out-there release.

Benchmarking

To perform a benchmark I ran a similar timed loop 90000 times at a rate of 5ms. This 90000 loop execution was then repeated 5 times. This is almost the same process the test takes. The 90000 loop is repeated for the entire test. 90000 is an instrument limitation in that it can only store 90000 data points. In our test application, the measurement gets taken inside the timed loop.

These 5 loops of 90000 samples was then repeated for each priority. I only tested the three extreme cases. Normal which is the default run type, Realtime and Low.
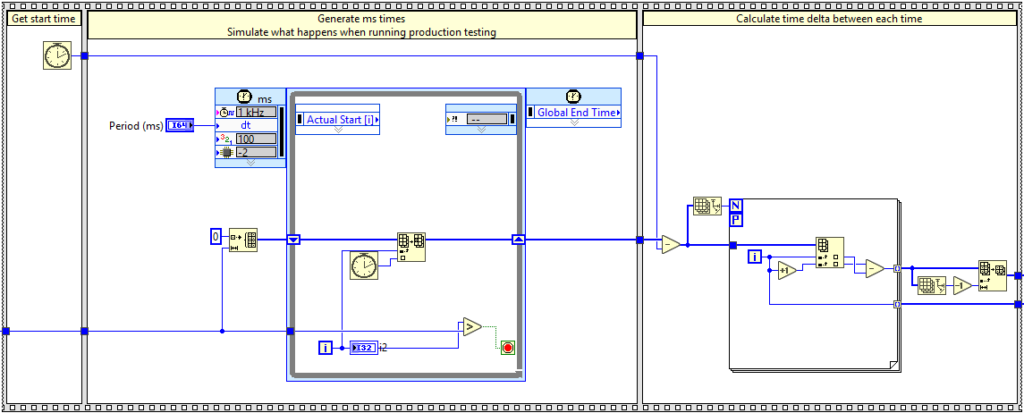
Benchmark code subset

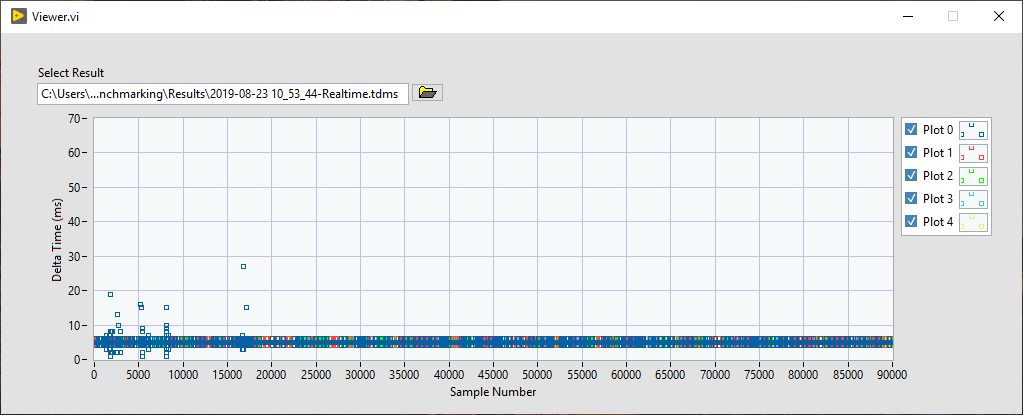
The three graphs below show 5 loops of 90000 samples running at a dt of 5ms. The numbers plotted are the delta time between each loop iteration. The time is taken from the Tick Count (ms) function as can be seen above.
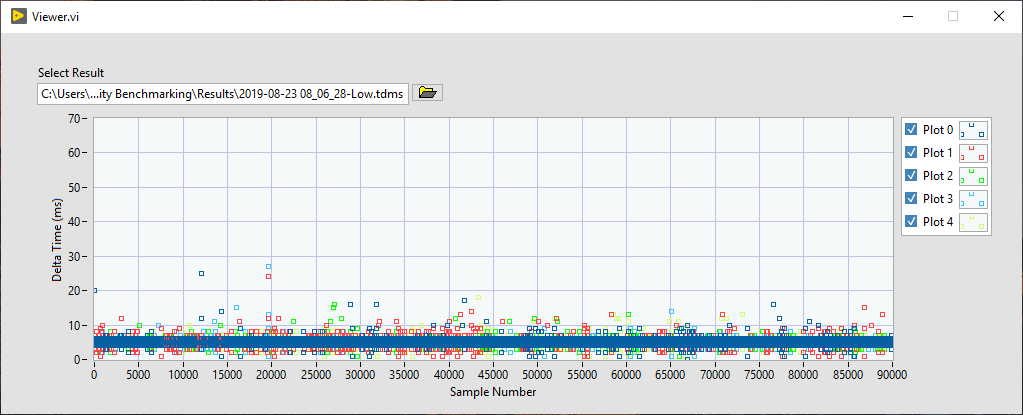
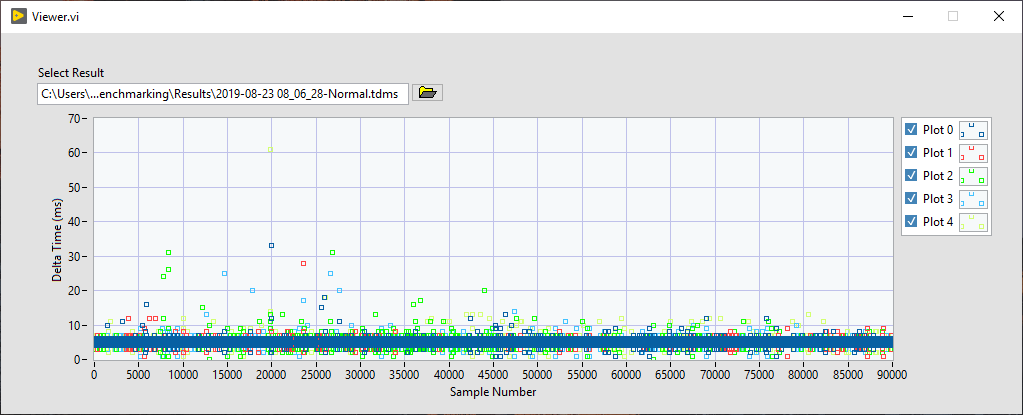
Low Priority
Normal Priority
Realtime Priority

From the images above, it can clearly be seen that running with Realtime priority gives a better periodic result, even when running with a timed loop. As virtually nothing is being done within the timed loop, I assume all the variance in dt is down to something Windows is doing. When we analysed the real test results, the variance was a lot larger.

All the code is in a Bitbucket repository so feel free to clone it and have a look. The repository contains a submodule so don’t forget to update the submodule.

git clone --recurse-submodules https://bitbucket.org/Labvolution/priority-benchmarking.git

I hope this explanation is helpful. Get in touch if you have any comments.
LabVIEW Environment Setup

Setting up your LabVIEW environment is rather personal as it guides your development flow. Enabling and disabling certain settings can make your development process more efficient and less frustrating.

While contracting for a company that has extremely tight IT permissions, combined with the way user accounts are managed, I came across another LabVIEW setup modification that significantly improved my efficiency, especially when building applications and installers.

LabVIEW uses two directories which by default are installed to %USERPROFILE%/Documents/LabVIEW Data/ and %LOCALAPPDATA%/Temp. The Compiled Object cache as well as other intermediate files are saved within these directories.

When developing on a standalone PC, making changes to these directories makes little difference as everything is kept local. However, when working on a supplied PC where the user directory is mapped to a network location, things can down significantly. The largest effect can be seen when working over a VPN with a networked mapped user directory.

So how can this be fixed?

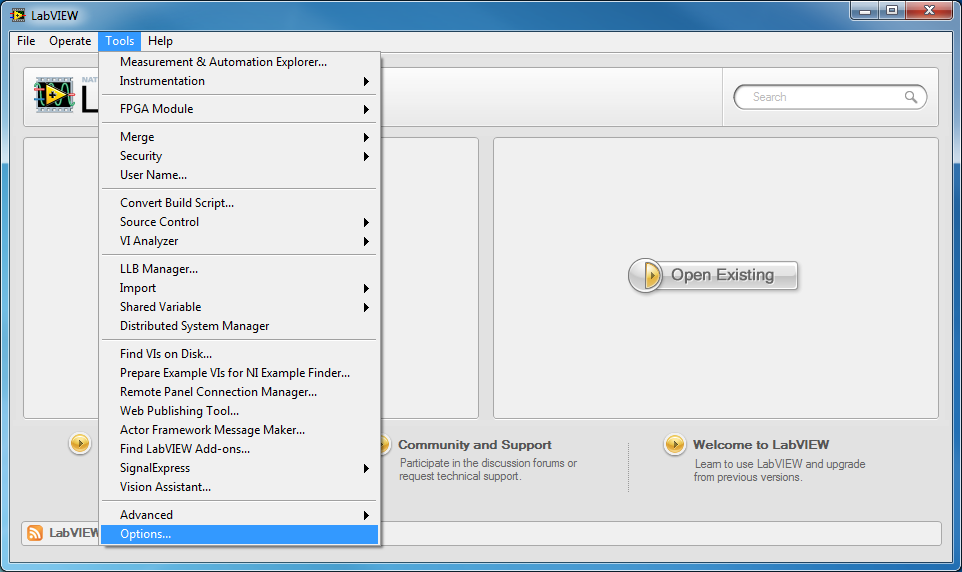
Open the LabVIEW Tools -> Options menu.

LabVIEW Tools -> Options

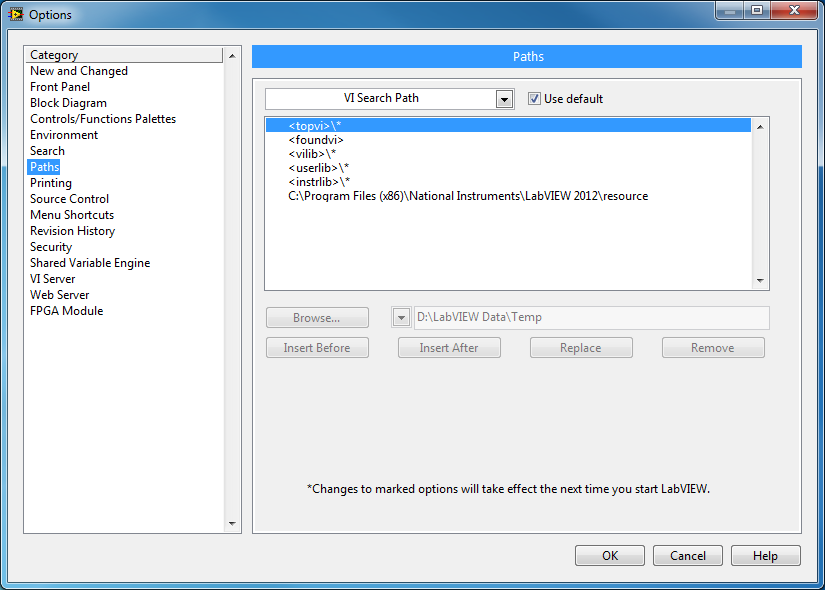
Navigate to the Paths section

LabVIEW Options -> Paths

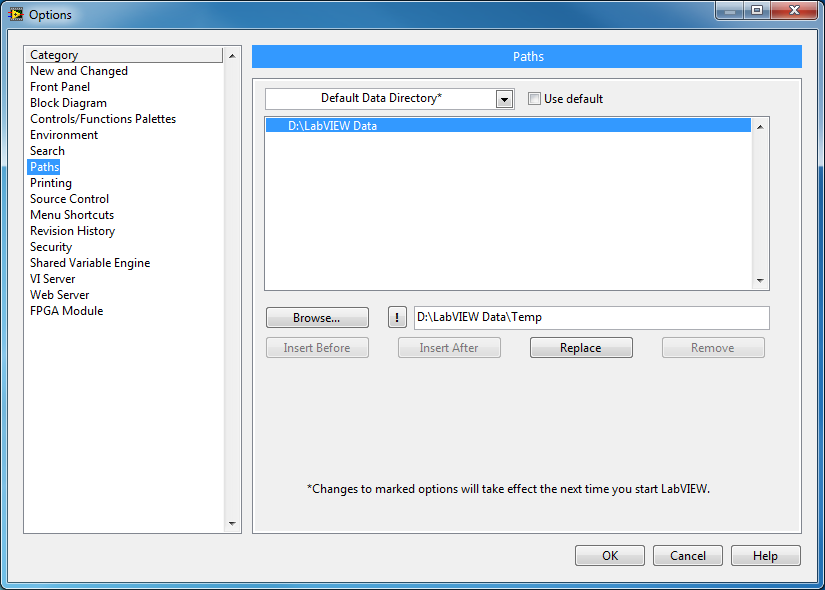
Select Default Data Directory from the drop down, deselect Use default. Then Browse to a local folder to be used instead.

LabVIEW Default Data Directory

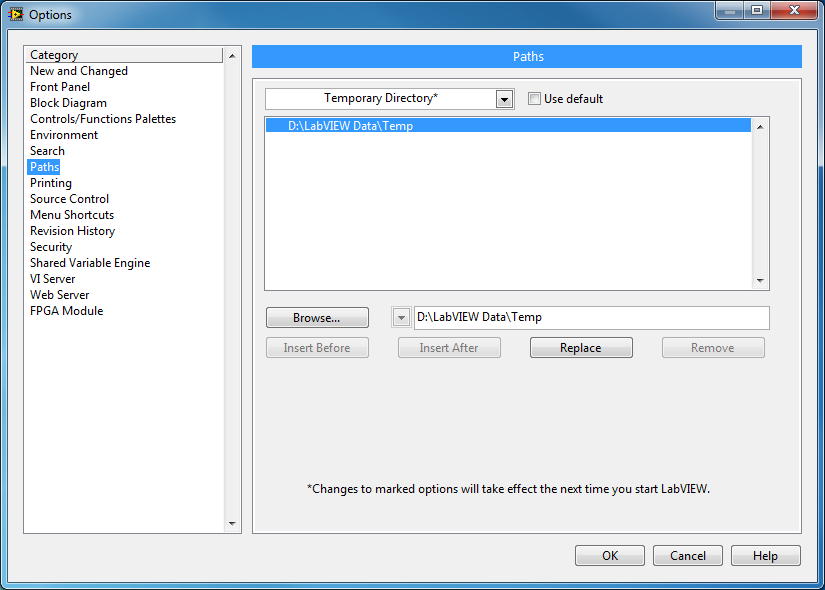
Select Temporary Directory from the drop down, deselect Use default. Then Browse to a local folder to be used instead.

LabVIEW Temporary Directory

Close the Options and restart LabVIEW. When restarting LabVIEW and opening projects for the first time after the change, you will notice a slow-down as the cache is rebuilt. This will only affect the first load of a project.

If you have moved the folders from a network to local directory, you should notice performance improvements when opening LabVIEW, opening projects and building distributions.

Why you should be using Git submodules

When working on software projects, specifically in LabVIEW, I have never liked the way reuse libraries and custom instrument driver libraries are source controlled or included in projects. I’ve tried multiple solutions, and each have their own ‘dirty’ feel about them.

Disclaimer:

I’m still trying to figure this out and learning more about submodules every day

The command line must be embraced as git submodules are not supported in many GUI tools.

Using vi.lib or instr.lib

Placing common libraries in either vi.lib or instr.lib is a good method of sharing the same version of library between projects. Typically, a vi package is created and then installed into the LabVIEW directory. The packages, as well as the library source code can be source controlled.

The disadvantage of this method, in my opinion, is when you want different versions of a specific library used across different projects. (I’m not a VIPM user so this might be possible)

Copy and paste the library into your project

Another method for including common libraries into a project is to copy and paste the source code into the project. This makes moving a project easy as all the dependencies are contained within the project, however it does break clean source code control and creates duplicate code.

The problem comes in when you want to make a change to the common library within a project but also want that change applied to other projects. The updated common library then needs to be copied to the other projects manually.

But what if only some projects need updating or you want to quickly and efficiently share the common changes between developers?

Say hello to Git submodules

Git submodules are reference pointers to other Git repositories. This means once a project is cloned from a repository, additional repositories can be added (cloned) into the existing project folder. Git submodule also supports recursion; however this is disabled by default.

As an example, I have two library repositories already created and stored on Bitbucket. The following will be a step-by-step of how to create a project and add the libraries as submodules.

Create a local bare repository

mkdir git-submodule.git
cd git-submodule.git/
git init --bare

Clone the main project repository

git clone "C:\git-demo\git-submodule.git" "git-submodule"

Once cloned, create and save a LabVIEW project, then commit it to the repository.

git add .
git commit -m "Add empty LabVIEW project for submodule example"
git push origin master

The files on disk should look as follows:

git submodule labview

Now we want to add your common libraries, which are in their own repositories, to our project. The two common libraries I will add is a simple dialog library and math library.

git submodule add git@bitbucket.org:Labvolution/driver_math.git
git submodule add git@bitbucket.org:Labvolution/driver_dialogs.git

Once the submodules have been added, a new file, .gitmodules, is created with the reference to the submodules.

git submodule labview

[submodule "reuse-libs/driver_dialogs"]
    path = reuse-libs/driver_dialogs
    url = git@bitbucket.org:Labvolution/driver_dialogs.git
[submodule "reuse-libs/driver_math"]
   path = reuse-libs/driver_math
   url = git@bitbucket.org:Labvolution/driver_math.git

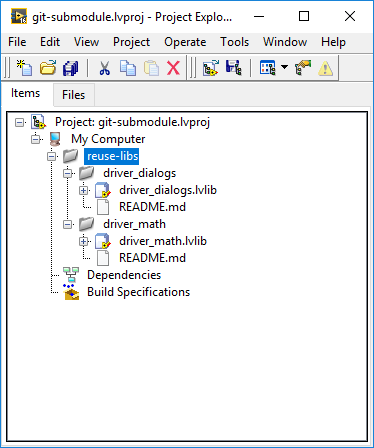
The reuse-libs folder now contains the submodule libraries.

git submodule labview

A git status on the main project repository will show the changes. These are automatically staged when the submodules are added.

git submodule labview

The changes need to be committed.

git commit -m "Add common libraries as submodules"

The common libraries, each in their own repositories, are now part of the main LabVIEW project which is itself in a repository.

git submodule labview

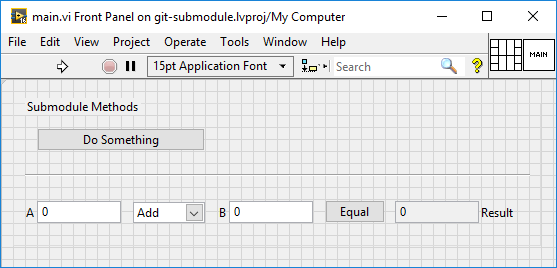
A main vi can then be created to test the libraries.

git submodule labview

These changes can be added and committed to the main project.

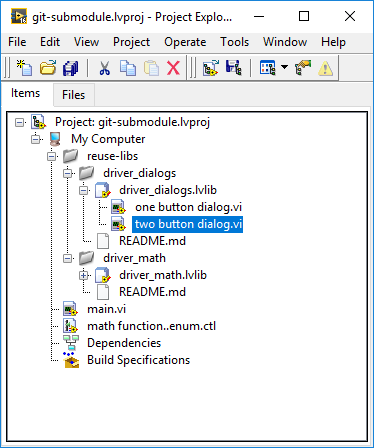
If a library is modified (by adding a new vi), committing the changes will be a two-stage process, the first being commit the changes to the library, and then committing the new submodule reference to the main repository. This tells the main repository which version (commit hash) to use.

git submodule labview

To use a previous version of the library, checkout a specific hash or branch of the submodule. Then git add it to the main repository.

git submodule labview

Notice that the “two button dialog.vi” is no longer available.

git submodule labview

A git status on the main repository will show a change in the submodule.

git submodule labview

Having to add a specific submodule reference to a main repository, allows you to use different ‘versions’ of the submodule in different projects.

LabVIEW Project

When there are git submodules within a project, it is always a clever idea to know what they are, even though they are tracked from the main repository.

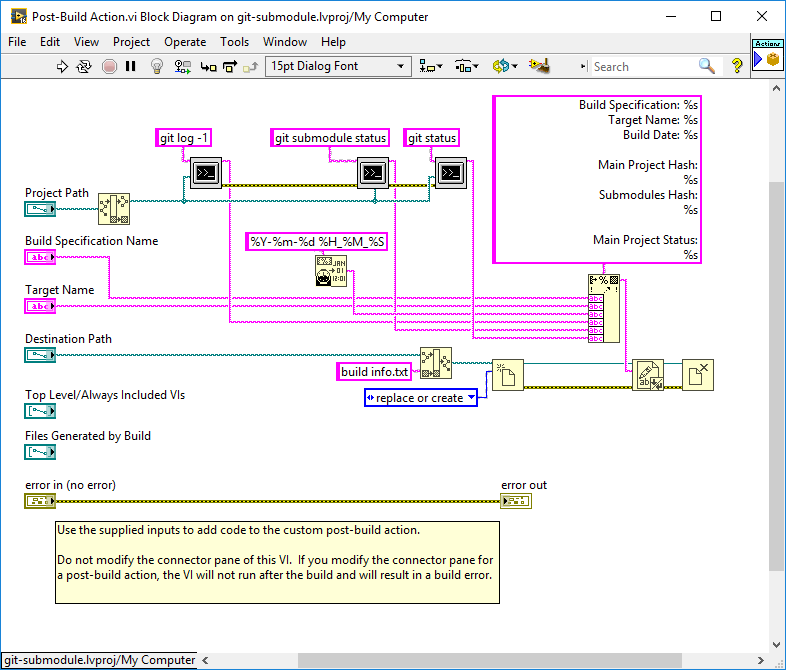
By using a post build vi, a log file can be added to the output build directory which shows what submodules are included, as well as what hash reference is used.

git submodule labview

The main part is the submodule information, as this can vary from project to project. To get the submodule status, execute

git submodule status

which will return

36054d63f5d22284e2b5d7e40798af0fbbda14e0 reuse-libs/driver_dialogs (heads/development/2016)
b2089a11fb281ebf5eebb29f9f9080d81ec66933 reuse-libs/driver_math (heads/development/2016)

Conclusion

I have started using Git submodules in new projects as well as refactoring old projects when needed. I see a huge benefit in using them as they encourage

  • multiple smaller repositories for common libraries
  • low coupling as common libraries should be stand-alone
  • multiple projects can share a common library, but not be forced to use the same version
  • a submodule can have its own submodule

There is a learning curve that needs to be climbed when starting out using Git submodules, however seeing what they provide in the long run, it’s well worth it.


References:

https://torbjoernk.github.io/article/2013/04/03/struggling-with-git-submodules-and-mercurial-subrepositories/

https://git-scm.com/docs/git-submodule

Adding C# Class Libraries into LabVIEW Applications

Knowing how to include C# libraries into a LabVIEW project can be a very useful tool. There are many reasons why you would want to include C# dll’s into a LabVIEW project but the two that come up most often for me is reusing legacy code that was initially written in C# and writing a C# wrapper when wanting to use a third party driver or library.

Sometimes it’s easier to write the wrapper in C# and then implement the library directly in LabVIEW. When interfacing directly to a third party driver/library, the LabVIEW code to accomplish a relatively simple task can be very messy and cumbersome to read; hence the C# wrapper with simple implementation in LabVIEW is my preferred method. This is how I made my LabSSH and LabSFTP libraries.

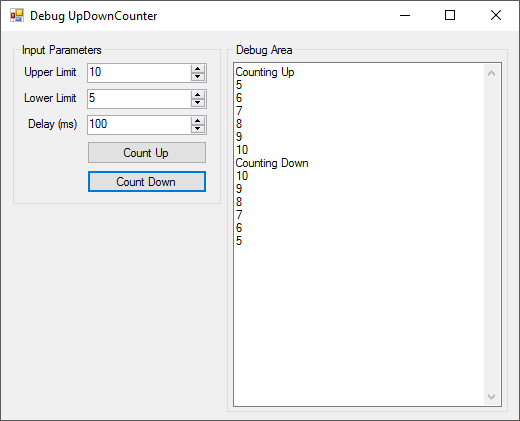
This post is going to cover the process of creating a C# Class Library, creating a C# Form Application to test the library and then finally how to bring it in to LabVIEW. The example that I have used is a very simple counter class. This class will either count up or count down between an upper and a lower limit. The delay between counts can also be set.

When the counter increments or decrements, the current value will be passed to the calling application (Form Application or later LabVIEW Application) using a callback event.

For each section I have created a walk through video instead of a formal tutorial. I find videos easier to follow and you can see the steps to follow a bit easier.

Please note the linked videos are not meant to have sound.

Creating the C# class library

First we need to cover some definitions:

  • Delegate – A delegate is a type that represents references to methods with a particular parameter list and return type. (Read the full definition here)
  • Event – Events enable a class or object to notify other classes or objects when something of interest occurs. (Read the full definition here)

Creating a C# Form Application to test the library

Adding a form application to your solution allows you to test the library in the environment that it was written. I prefer this to testing directly in LabVIEW as each time a new version of the dll is compiled, LabVIEW needs to be restarted.

By testing the dll in C#, you can get immediate feedback to your dll development. If there are problems with the dll when you move to LabVIEW, you know that the functionality is working so the problem is more than likely in the LabVIEW implementation.

C# LabVIEW Form Application

Implementing the library in LabVIEW

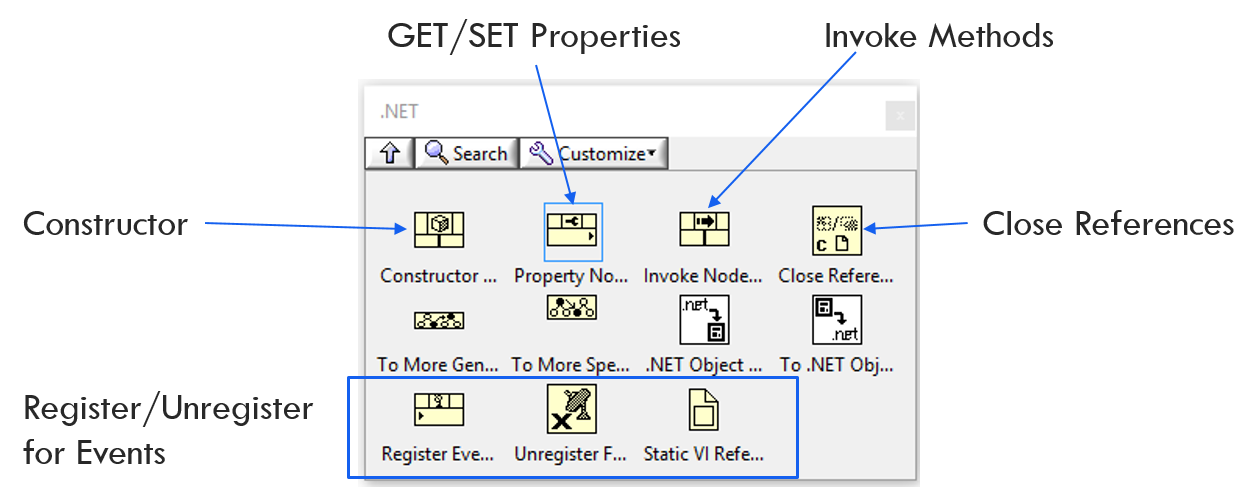
The .NET objects can be found in the Connectivity section of the functions palette.

LabVIEW .NET methods

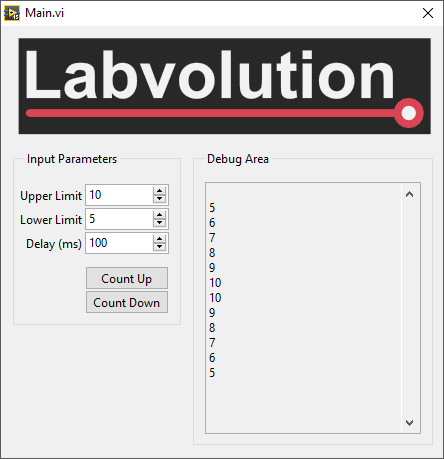
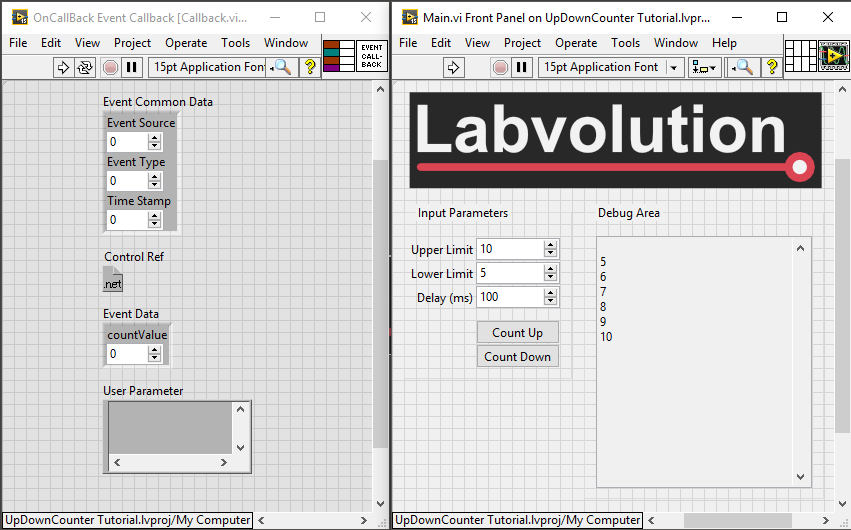
C# LabVIEW Form Application 2

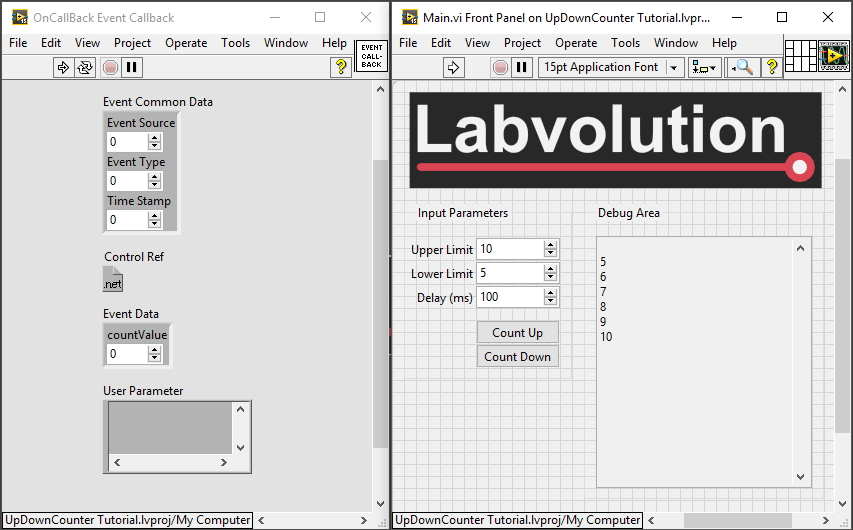
A common bug in LabVIEW is that the callback vi remains reserved for execution even once the references are closed, the event has been unregistered and the application has been stopped.

C# LabVIEW Callback Event Remains Reserved

A way to get around this is to include an invoke node once all the references have been closed. Right click on the invoke node and select the following: Select Class >> .NET >> Browse >> mscorlib (4.0.0.0) >> System >> GC >> [S]Collect()

As soon as this method is placed on the block diagram, the callback event vi will no longer be reserved for execution.

C# LabVIEW Callback Event Cleared Reserve

In summary, this is a very simple implementation of creating a C# Class Library, testing it using a C# Form Application and then using the Class Library in a LabVIEW project.

You can download the C# and LabVIEW source below and as always if you have any questions, please get in touch.

Download LabVIEW and C# Class Library

Greg

SFTP File Transfer for LabVIEW

Please note that this project is no longer being supported and does not support some of the newer connection methods.

Leading on from the LabSSH Library that I shared a while back, I have also created a LabSFTP LabVIEW library.

From Wikipedia, SFTP can be described as follows:

In computing, the SSH File Transfer Protocol (also Secure File Transfer Protocol, or SFTP) is a network protocol that provides file access, file transfer, and file management over any reliable data stream.

As with LabSSH, LabSFTP uses a custom .net class that incorporates some of the features of the RENCI SSH library.

LabSFTP offers the following features:

  • Password authentication to a remote host
  • Private/Public key authentication using the openssh key format
  • The ability to get a list of files or folders from a specified location on a remote host
  • The ability to upload files
  • The ability to download files
  • A public method to check the connection status
  • A public method that will send a stay-awake signal at a specified interval

The video below shows the library being used in an application. The LabVIEW application is communicating with a LinuxLite installation running on a virtual machine.

To get up and running, open the library and start by running the test vi. This will create a connection, get a list of files from a specified location, upload a file and download a file. Make sure that your paths are correct. It has been left to the developer to make sure that files and paths are correct before executing the the specific methods.

As with all my posts, you can download the LabVIEW code below. If you have any feedback, please feel free to contact me on Google+ or send me an email. The LabVIEW application has been tested using LinuxLite and on the latest Raspbian Jessie image running on a Raspberry Pi3.

Download LabVIEW LabSSH & LabSFTP Library

Greg