My Pursuit of LabVIEW CLD Status

Over the last few weeks I have been honing my LabVIEW programming skills. Not having a full-time job at the moment, very long story, makes this learning easier; I have a lot of time on my hands, but also trickier; I only have the four example exams from the NI website and my imagination to come up with programs to write. My mind also wonders onto Raspberry Pi, TI LaunchPad, running in the forest and various other distractions. 
As can be seen from my last post, I have worked through the four example exams with varying success. I have started round two to get my times down and skills up. So far so good.
I downloaded the example exams quite a while ago but for some reason I found myself back on the CLD e-kit webpage yesterday. Either a new download has recently been added or I just haven’t noticed it before, but there is a a download called Preparation: Download Certification Prep Exam Sample Exercises.
This folder is brilliant. Firstly, it gives you a break from writing long, complete programs and secondly, it explains/demonstrates some fundamental processes that can be used in your final programs. The exercises are also only around 45-60min long so great when you don’t have much time. 
I worked through 6 today and although I knew most of the principals, it was nice to get a reminder and refresher on some of the basics.
So if you don’t have the exercises yet, go and download them and have a look. 
Greg

    LabVIEW CLD Preparation

    I am busy getting ready for my LabVIEW CLD exam so working through the worked examples. I have just completed the first one, The ATM Machine and would really appreciate any feedback that you can provide.
    After looking at the solution, I realised that my version of the solution might have been a bit of overkill, but it works and this is a learning process for me. I will be adding all my solutions here so will try and keep this as clean as possible. If you do decide to comment, please not what solution you are commenting for.
    What I have learnt from the example exams:
    • If you get stuck on a section. leave it, carry on and come back to it later. It’s better to get as many sections completed as possible rather than having one section not working and the rest not done as time ran out. I got stuck on one section for 45min and was just getting frustrated with myself. I eventually got up and left it for a few hours, I know you cant do this in the exam. When I came back to look at it, I solved the problem in 5min, a Boolean constant was false instead of true.
    • Document, document, document. Do documentation as you are writing the code. There might be no time left at the end to get your documentation done and it is a HUGE part of the total mark. I still need to do much better here.
    • A quote that I heard while doing an edX online course. “Comments should describe things that aren’t obvious from the code: WHY, not what” John Ousterhout
    • Practice, practice, practice. There are a few tricky areas that I have picked up by doing the example programs. Small/simple things that have taken a lot of time to figure out. Just being aware of these might save you a lot of time.
    • Test your code regularly. The more you test the better the chance of you having a working program to submit. I test my code after every change I make. This might be overkill, but at least I know that I will always have working code with the functionality that I have added.
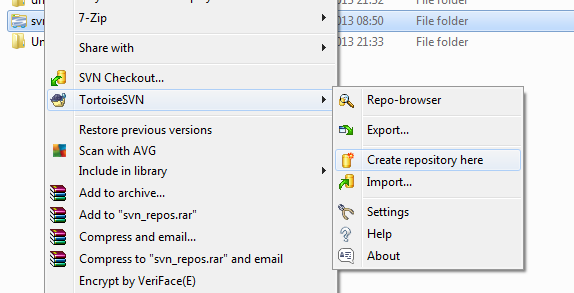
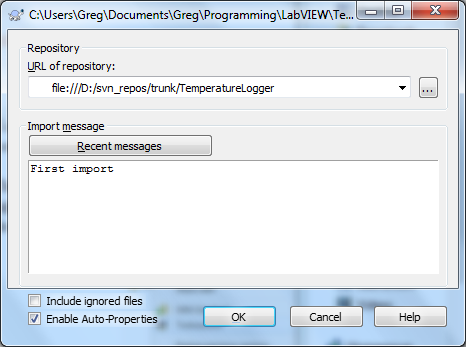
    • When I redo the example exams next week, I am going to start getting into the habit of backing up my code. I currently use Tortoise SVN to make regular backups but this is not available for the exam. Keep a working copy and backup after you finish a section.
    • Use breakpoints, extra indicators and the probe tool to debug. Sometimes a simple problem that can a long time to figure out, but this time can be drastically reduced by using the tools available.
    ————————————————————————————————————
    ATM Machine 1:
    Here are some questions that I have:
    • Is it necessary to provide HTML help files for every VI? Takes quite a bit of time which could be used elsewhere.
    • For the exam, do you need to make an executable to provide with the solution?
    • I know my ‘Enter Pressed’ case in the MHL needs some work.
    • Is there a way to update a single element in the Accounts.txt file or do you need to rewrite the whole file?
    You can find my post on the NI Forums here.
    ————————————————————————————————————
    Boiler Controller 1:
    I have just finished the Boiler Controller example. This took me around 5 hours so I’m getting quicker. Need to practice some common VI’s that I use so that I can get those done quickly. I found the question not as clear as the ATM Machine but I think I got there.
    Some questions again:
    • The Stop button; is that just to stop the application because the shutdown button just restarts the application.
    • I ended up using quite a few local variables but not sure if that’s OK. Is there another way to do things. The main place I used them was for the start and shutdown process to remember the button states and valve position value.
    • My Time Count only counts in seconds. Is it necessary to count in milliseconds?
    • Is it necessary to disable any controls or indicators during certain steps? As far as I can see it doesn’t say so.
    ————————————————————————————————————
    Car Wash 1:
    This exam was by far the trickiest so far. Once I managed to get my head around the timing system, then the rest of the program just fell into place. I started yesterday and finished it this morning for a total time of around just over 5 hours. Practice is still needed but I am slowly starting to used to some concepts which I will study and hope to be able to use in the CLD exam.
    Only one questions this time:
    • Is it better to update the display in an Update Display case or each time outside the case but inside the While loop like I did in this program? I found it easier to do it this way.
    ————————————————————————————————————
    Sprinkler System 1:
    I finished the Sprinkler system in just over 4 hours which included being stuck on one part for over an 45min. Out of the four examples, I feel this one was the easiest to complete. I am not sure if is because of the practice that I have been having, or because it is the easiest question. I feel that I am getting there which is good.
    Next is to practice some common components that I can build quickly to save time, like the timing engine and getting the front panel built as quick as possible.
    ————————————————————————————————————
    Thanks in advance for all your advice.
    Greg

    Raspberry Pi temperature profile using LabVIEW

    Connected to my Raspberry Pi is a DS18B20 temperature sensor which I have mounted inside the case roughly above the processor. I wanted to map the temperature profile inside the case and have a visual representation of it. To do this I joined up a Python script, an SQLite3 database and LabVIEW.
    I only have one temperature sensor connected and the RasPi doesn’t run very warm so this image is rather exaggerated. I’ll explain a bit more later.
    So I started off by writing a Python script that runs on my RasPi. It measures the temperature and then logs it to a SQLite3 database that I store in a shared folder on a mounted USB flash drive. I have accelerometer data in the database too, but that will be added a bit later.


    That is all that happens on the RasPi. Next I wrote a LabVIEW program that queries the database over the network to get all the data. I need to do a bit of work on my query to just return the last line of data but that I’ll add in future versions.
    To query the SQLite3 database, I used the this toolkit which works really well and is super simple to get set up. Once I have the temperature, I need to display it on in user interface. This is where Sensor Mapping Express VI comes in really handy.
    All you need to do is point to your .stl file and select where you want to the temperature sensors to sit on the RasPi. I used this model which I converted using Google SketchUp. This is where I had to use four dummy senors to be able to show the temperature difference. I have set the outside 4 sensors to 0 degrees Celsius and only sensor 0 is getting the temperature from the database. With more sensors this can be made a lot more accurate. As I said earlier, this is just to prove a concept for now.
    Every 100ms I query the database, build an array with the temperature data and then apply it to the Sensor Mapping Express VI. The temperature profile then changes according to the surface temperature of the RasPi.
    Here are the colours that I used for my mapping:
    Temperature vs Colour mapping:
    0 Celsius R-0 G-0 B-255
    21.25 Celsius R-0 G-255 B-255
    42.5 Celsius R-0 G-255 B-0
    63.75 Celsius R-255 G-255 B-0
    85 Celsius R-255 G-0 B-0
    I have already connected up an ADXL345 accelerometer which is acquiring tilt and pitch values, so my next step is to be able to move the  model in LabVIEW as I move my physical RasPi. Should be some fun for a few more hours.
    If you want a copy of my code, you can grab it over below.
    Please feel free to leave any tips, comments or questions below.
    Greg

    Source Control for LabVIEW using TortoiseSVN

    For a long time now I have been using LabVIEW, but I am not very diligent at using source control. Source control is one of those things that you never really need until it’s too late. So this weekend I decided to install TortoiseSVN on my laptop to start out small, but get into the habit of backing up and recording the changes I make to my code. 
    To get up and running is rather easy. Go over to TortoiseSVN and download the install file. Once installed, you are ready to get going. 
    The first thing to do is make a folder somewhere to store your repository. I called mine svn_repos. Now right click, you will see an option for TortoiseSVN. Select the Create repository here option from the drop down menu. 

    Once you have created the repository, go over to the folder that you want to back up. Right click on the folder and select the import option under the TortoiseSVN menu. A window will pop up where you need to enter the path and details of the change. My folder name is TemperatureLogger so just change that in the path to suit your folder.

    Press OK and all the files in that folder will be backed up.
    Now you need to get a  working copy. I use the same folder but you can select any folder for your working copy. Right click on the folder that you have just imported and select the SVN Checkout option. Select your path and if it is the same path you will get a warning. Click OK and when the checkout is complete, you will notice that there is a green tick icon over the folder. When you make any changes to the files, that green icon will turn red.
    The LabVIEW part is to now install the JKI Toolkit for TortoiseSVN. Firstly you need to install the VI Package Manager. Once installed, search for TortoiseSVN in the user interface and install it. This takes a couple of minutes and needs your input for a few of the steps.
    Once everything is installed, open one of the files that you previously imported and checked out in LabVIEW. Make any change and then save it. You will now notice that there is a red icon over the files that have been changed. 

    In LabVIEW, go to tools > TortoiseSVN > commit. 

    Here you will be given the option to add a comment for the changes that were made. This helps you track your changes over time.

    You will now notice that icons over the files are back to green letting you know that you have backed up all your files.

    You can also get these options directly from Windows Explorer, but it is really convenient to have the option to back up your work directly from LabVIEW. There are many more tools to be used and they are explained pretty well in the documentation.
    Well I hope this helps you start to back up and document the changes that are made to your programs. Please don’t forget that this can be used for any type of files, not just in LabVIEW. All you need to do is right click on the file or folder and choose the option under the TortoiseSVN menu.
    Greg

    LabVIEW: CLAD certified

    I have been working with National Instruments’ LabVIEW software and hardware for about 3 years now. Unfortunately I have not been able to do any courses or qualifications through the companies I have worked for so I just learnt and taught myself as I went along.
    All that changed after I moved to the UK. I went to a NI symposium and they offered a Certified LabVIEW Associate Developer (CLAD) exam at the end of the symposium for all those that wanted to take it. 
    I decided to go for it and make the most of the opportunity given to me. I thought it went well and was quite confident when I left the exam. However, from my experience, that doesn’t always mean a good thing.
    Well this morning, after waiting a few weeks, I got an email from NI with my CLAD certificate. I passed and am now CLAD certified. 

    I have been waiting a long time to get this certification and finally have it.
    Thank you to NI who offer such an exam to those willing to work for it and stay after the symposium has ended.
    Greg