C# dll for programming Microchip PIC’s

In the test development environment, the need often arises where a microcontroller needs to be programmed before the testing can be completed. This can either be done with the development environment or through the command line if this method is provided for by the manufacturer. 
Programming in the IDE is nice and easy, but very slow and needs the user to press the buttons. Often in the test environment, this process needs to be automated with as little user input as possible. Here is where using the command line parameters comes in so handy. You will need this hard-to-find document which outlines the commands to use.
In my application I am programming the PIC18LF26K22 microcontroller from Microchip and using the MPLAB PM3 device programmer. To test the devices I am using LabVIEW and TestStand from National Instruments. 
There is a provision in LabVIEW where you can run command line programs, but I have found this to be a bit slow when interfacing with the PM3 programmer. This made me think of writing a C# dll to perform this task. Now I am no expert at C# programming, but am trying to learn where I can so thought this would be a good exercise. 
I started off be investigating the Process Class and found just what I was looking for. All you need to do is create a new object of the Diagnostics.Process class. Then build the string that you need to send. The make up of this string is explained in pdf attached above. 

public bool LoadImageToPm3(string pm3CmdPath, string port, string hexImagePath)
{
System.Diagnostics.Process proc = new System.Diagnostics.Process();
proc.StartInfo.FileName = pm3CmdPath;
proc.StartInfo.Arguments = "/" + port + " /P18LF26K22 /F" + '"' + hexImagePath + '"';
proc.StartInfo.RedirectStandardOutput = true;
proc.StartInfo.UseShellExecute = false;
try
{
proc.Start();
strStandardOutput = proc.StandardOutput.ReadToEnd();
proc.WaitForExit();
int iSuccessful = strStandardOutput.IndexOf("Operation Succeeded");
if (iSuccessful > 0)
{
return true;
}
else
{
return false;
}
}
catch (SystemException e)
{
return false;
}
}
This is an example of how to load an image onto the PM3. I build the string and then once I start the process, I read the standard output to make sure the the operation was successful.

The dll I wrote can handle loading an image to the programmer, program a device where the image is already on the programmer and erase the device. There are many other processes that can be performed but for the production testing that I am doing, this is all I need.

In the project attached, I also wrote a simple form application and a TestStand sequence to test the dll. You can find those files here.

By using a dll, I decreased my programming time from 60sec in LabVIEW to 15sec. When the device being tested only takes 30sec to test, an extra 45sec programming time is huge.

I hope this helps and if you need anything explained further, please leave a comment and I will try help where I can.

Greg
LabVIEW: Simulating keyboard events

Another useful trick in LabVIEW using the user32.dll is to simulate keys being pressed on the keyboard. I haven’t come across the need very often, however when using console applications, it can be necessary.
I ran into this problem while running a console application that runs a GPS simulator. Getting the application to run was easy and when the simulated trip is complete, the console closes automatically. The problem came in when I wanted to stop the controlling LabVIEW application. When I stopped the LabVIEW application and if the console was still running, I needed to close it and wanted to do it all in one step, instead of forcing the user to stop the LabVIEW application AND close the console window.
After some research I found out that the user32.dll has a keyboard event method so I decided to use that. I first had to make the console window active, find out how here, and then I would run this application as a sub-vi to simulate a Ctrl+C which was needed to stop the GPS simulation and close the console. 

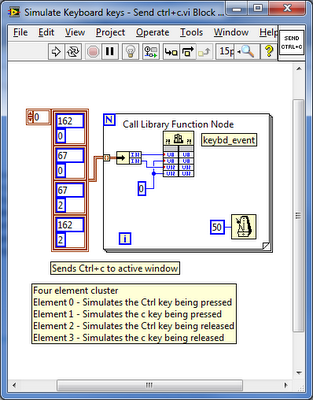
What happens is that the two integers need to be passed to the dll. The first element is the decimal representation of the ASCII character that needs to be simulated and the second is what motion the button makes.
EG: 162 is represents the Ctrl key and 67 is the decimal representation for the ASCII uppercase C. The second integer that is passed to the dll is used to decide what the button is doing. 0 Simulates that the button is being pressed and 2 simulates that the button is being released.
Therefore, by writing each cluster to the dll in a for loop with 50ms delay between loops, Ctrl+C is written to the active console window which will stop the GPS simulation and close the window.
To download the example VI, use this link.
Greg

LabVIEW: Making a window active

A small issue that I have been trying to resolve is when a LabVIEW application runs and multiple windows are open, the need is often there to bring a window to the front as some stages of the application. 

Now I am sure there are many ways to perform this task, but the easiest and most reliable way that I found is to use the user32.dll that is part of the windows installation. This dll is easily accessed by using Call Library Function Node. This can be found in Connectivity >> Libraries & Executables.


The three methods that are used are FindWindowA, SetForegroundWindow and ShowWindow. By wiring these us and adding the correct window name that you want to bring forward, when the program is run whatever window name is selected will be brought to the front. 

There are many other tasks that can be performed by using the user32.dll. I have used it in a few other places in my programs and will add some more posts in the future of where it can be used.

To download the example VI, use this link.

Greg

LabVIEW: Event Structure vs While Loop

When I started working with Event Structures in LabVIEW, I wondered what the difference was in terms of CPU usage. In a small program, managing efficiency might not be an issue but in a large testing environment where many processes need to be performed, the need for managing efficiency becomes quite important.
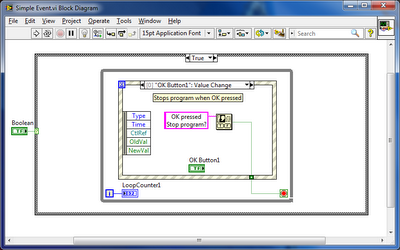
To test the difference in CPU usage between using the standard While Loop, which can get messy very quickly and the Event Structure, I wrote a simple program. The While Loop and Event Structure options are placed in different cases which is selected before the program is run. Both options monitor two buttons, display a message when either button is pressed and has a counter which shows how many times the loop is run.
The Event Structure monitors two buttons and displays a message for each. 
The While Loop also monitors two buttons but as it can be seen from the front panel above, it is quite a bit more messy than the Event Structure. If any more button or inputs need to be monitored, this method can quite easily get out of hand.
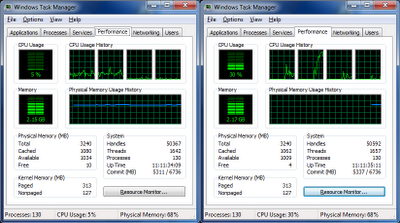
Here is the CPU monitor comparison of the two options being run. On the left is the Event Structure only using 5% and on the right is the While Loop which is using 30%. There are ways to slow the While Loop down like adding a loop delay but I wanted to show the extremes.
I hope this helps and can provide some display on the different ways to do a similar process.
To download the example VI, use this link.
Greg

LabVIEW: Creating custom buttons

It’s been something that I have been thinking about for a while but never really got round to trying. Creating custom buttons have a number of different applications and they are really easy to make.
To start off, you either need to decide if you want a button with an emblem (same image for true and false) or if you want a button that has a different image for true and false. You also need to find the images that you want displayed on the buttons. A good place to start is a clipart website like this one.

Download the images and then resize them. I use an image size of about 60px x 60px.
  • Open the LabVIEW start up window and under New, select More
  • Under Other Files, select Custom Control
  • We now need to place a button so we can change what it looks like
  • Place a button control onto the front panel
  • Select your first image by navigating to Edit >> Import Picture to Clipboard
  • Right click on the button and select Import Picture from Clipboard >> True/False/Decal
  • True will display the picture when the button is in a true state. False will display the picture when the button is in a false state. Decal will embed the picture for all states.
  • Do the same process to attach the next image for the other state
  • Save the control and then use it in a normal VI
That’s about it. Pretty simple to create custom controls.
To download the example control, use this link.
Greg