I have tried a number of times over the last year or so to get my head around the Actor Framework in LabVIEW. I started by reading the recommended starting point and went through all the examples, templates and hands-on. After trying a number of times, unsuccessfully, I put it to one side for another day.
My two main stumbling points, I felt, was not having a project to implement the framework in and not really knowing where to start. All the examples that I worked through started with a relatively large project and I could not find an example that starts with an empty project and builds up from there.
Last week a colleague explained the basics to me and over the last two weeks I have been working on a large project using the Actor Framework. I am finally getting an understanding of it and seeing the potential power in using the framework. Below is an example/tutorial on how to start from an empty project.
Recommended reading
Now for my example
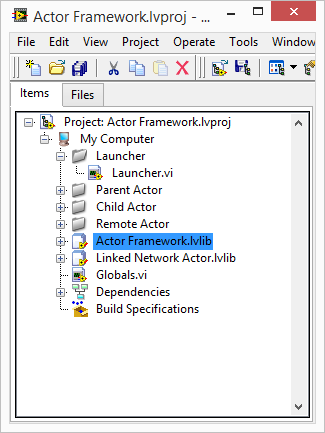
Start off with an empty project and add three virtual folders named, Launcher, Parent Actor and Child Actor.
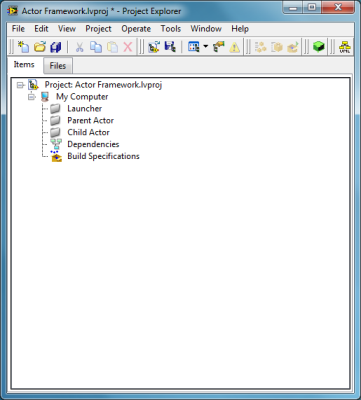
- Launcher: Main vi which is used to start the program. Launches Parent Actor
- Parent Actor: Main Actor which will launch Child Actor
- Child Actor: Another Actor that can do things
The Parent Actor and Child(ren) Actor(s) will be created in a similar way. The main differences are the way in which they are started. I will explain how to create the Child Actor and then only show the differences in creating the Parent Actor.
You need to add Actor Framework.lvlib to your project. This is needed so that the classes we are going to create can inherit from Actor.lvclass. Actor Framework.lvlib can be found in C:\Program Files (x86)\National Instruments\LabVIEW 2013\vi.lib\ActorFramework\.
Child(ren) Actor
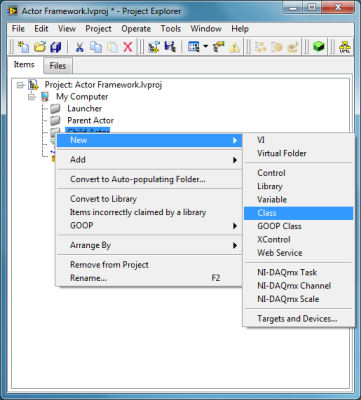
Create a new Class inside the Child Actor folder and save it.
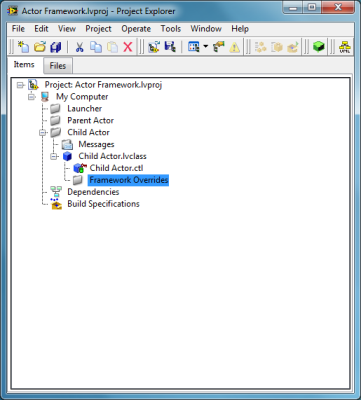
Create virtual folders called Messages and Framework Overrides.
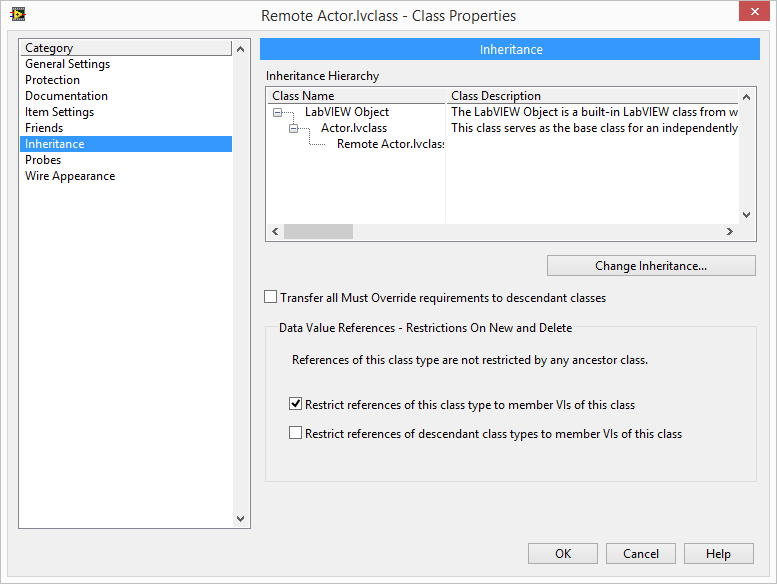
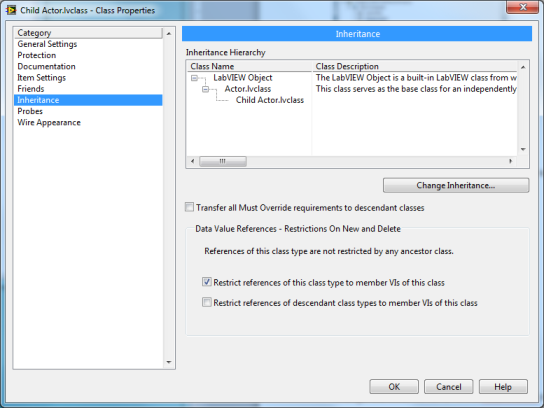
Change the inheritance of Child Actor.lvclass to inherit from Actor.lvclass.
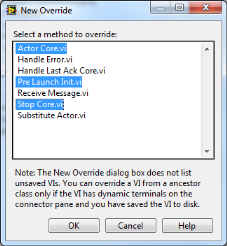
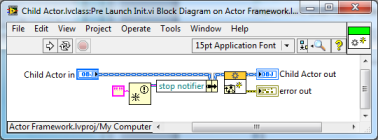
Create three vi’s that override the Actor Core, Pre Launch Init and Stop Core. Pre Launch Init will be used to create a string notifier and Stop Core will be used to clean up the notifier. These vi’s are called before and after Actor Core is launched and stopped respectively. Actor Core will be the main vi that is run. This is where your Actor’s functionality happens. Save these vi’s and add them to the Framework Overrides folder in the project.
Follow the following steps to be able to stop the Child Actor when Actor Core is closed.
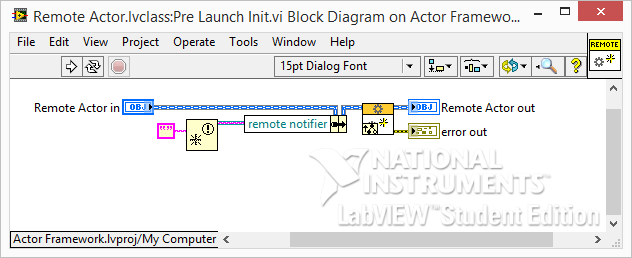
Child Actor.lvclass:Pre Launch Init.vi
- Create a notifier with an empty string for the data type
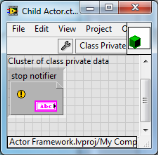
- Use the notifier out terminal to create a control, rename it stop notifier and then move it into Child Actor.lvclass private data cluster.
- Bundle the notifier out into the Child Actor object
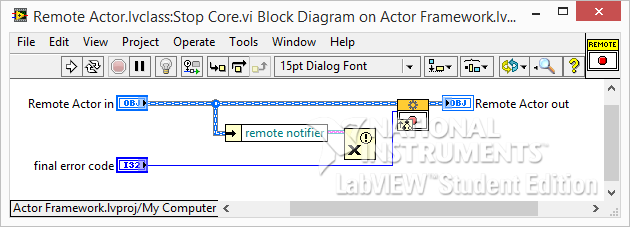
Child Actor.lvclass:Stop Core.vi
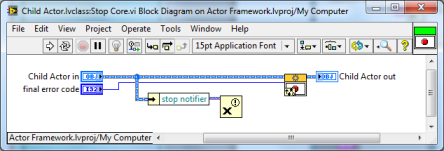
- Unbundle the stop notifier from the Child Actor object
- Release the notifier
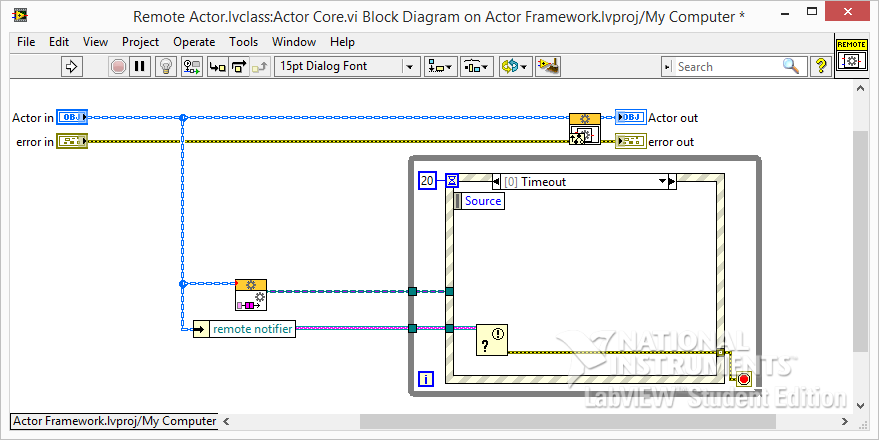
Child Actor.lvclass:Actor Core.vi
- Create a while loop and an event structure inside with a 20ms timeout
- On timeout, add a Get Notifier Status and wire the error cluster to the while loop stop terminal
- Unbundle stop notifier from the Child Actor object and wire the notifier into the Get Notifier Status vi
- This monitors the notifier every 20ms and when it is released in Stop Core, it will stop Actor Core. This is one of many ways that can be used to stop the Actor.
- Add an event for Panel Close?
- From the Actor Framework functions palette, place the Read Self Enqueuer outside the while loop and the Stop Actor inside the Panel Close? event.
- Wire the Child Actor object to the Read Seld Enqueuer and the Self Enqueuer to the Stop Actor.
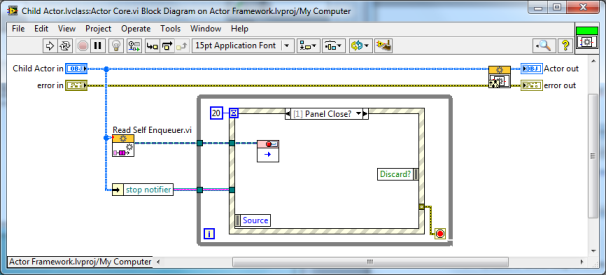
The Read Self Enqueuer vi gets the queue for itself. So what is happening here is the Stop Actor vi is being run on the Actors own queue which will call Stop Core, release the notifier and then stop the entire Actor.
Next, create the Parent Actor using the same steps. Once complete, add the following modifications.
Parent Actor.lvclass:Actor Core.vi
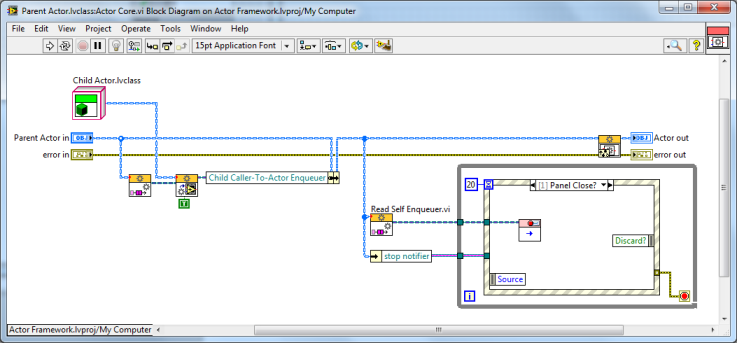
The Parent Actor will be responsible for launching the Child Actor. To do this we need to:
- Add the Launch Actor vi with the Read Self Enqueuer defining which queue to execute on.
- Add a control of the Actor’s enqueuer to the Parent Actors private data and bundle it into the Parent Actor object.
- Drag the Child Actor.lvclass from the project window onto the Parent Actor Core block diagram and wire it into the Launch Actor vi.
This will now launch the Child Actor before running the Parent Actor core. Make sure that if you want to show the front panel of the Actor being launched, you need to set the Open Actor Core front Panel? To TRUE as the default is false.
Creating the Launcher to start the Parent Actor
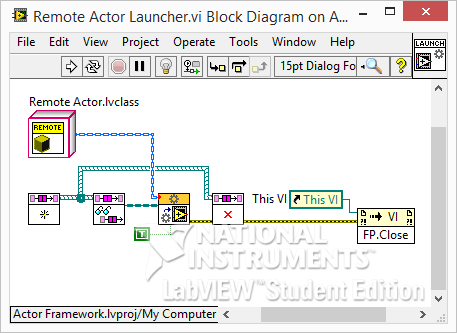
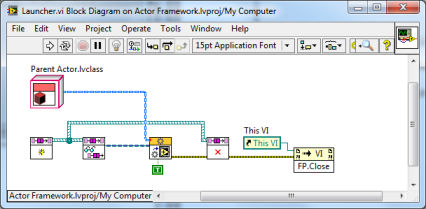
- Create a new vi in the Launcher folder and name it Launcher.vi
- You first need to create a queue for the Actor Core to be launched on.
- Then Launch the Actor by wiring in which class you want to launch. In this case we wire in the Parent Actor class
- Then release the queue and close the front panel. You can make fancy launchers with splash screens, but this one is just a plain vi with an empty front panel
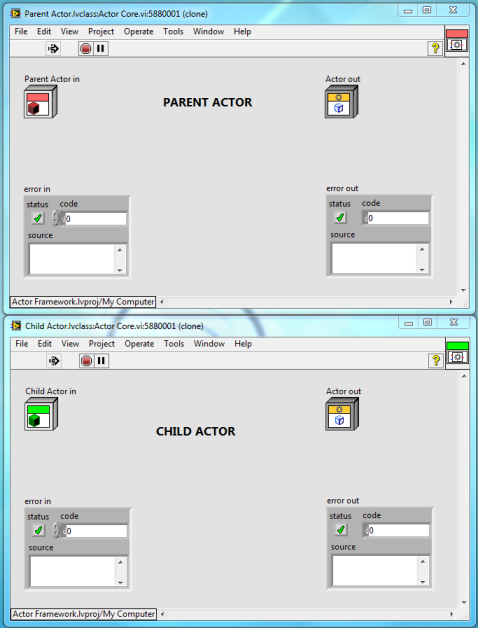
You should now be able to run the launcher which will start the Parent Actor. The parent Actor will then start the Child Actor. When you close the two Actors, they should stop cleanly. If this works then we can carry on. If not, go back and make sure that you are releasing all the notifiers and queues.
Communication between Actors
Add a Boolean control and indicator to the Parent and Child Actor Core. Setting the control in the one Actor will set the indicator in the other Actor. This will show the basics of sending messages between Actors.
Parent to Child Actor
You need to add references to both Actors for their respective indicators. We will use these references to get and update their state from other vi’s with the class. You also need to add a reference control to the Parent and Child class private data.
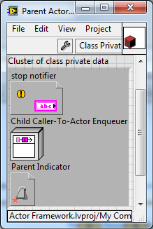
Make sure you add references to both the Parent and Child Classes.
We now need to create a method (vi) in the Child Class that is going to change the Child indicator when told to do so. Create a new VI from Static Dispatch Template in the Child Class. Save it with the name Get state from Parent.vi.
Add a Boolean control to the front panel and connect it to the connector pane. In the block diagram, unbundle the indicator reference, wire it into a property node and then write the Boolean state to the value property.
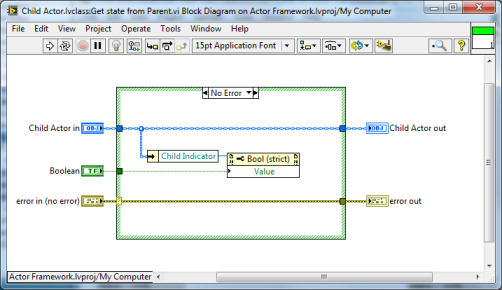
This vi is the method that does the work of changing the Child Actor front panel indicator. We now need a way to be able to run this vi from the Parent Actor. There are some tools that allow us to create these messages really easily.
From the project window, select Options and then Actor Framework Message Maker. This will open a window and allow you to create messages for methods that are in your project. Select the method that we just created and click Build Selected.
A Get state from Parent Msg.lvclass is created with two vi’s. Close the vi’s and move the class to the Messages folder within the Child Actor.
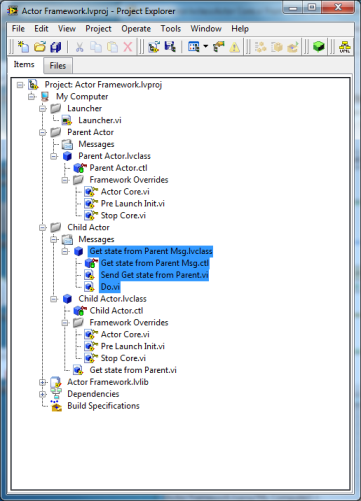
The Send Get state from Parent vi is used to add the data to a queue and the Do vi calls the method that we created a step back. I am not going to go into the details of these vi’s but feel free to open them and see what is going on.
Now that we have our Message and our method, we need to go back to the Parent Actor and to define when to execute this message.
In the Parent Actor Core, add an event case to handle a value change from the Boolean control. This is where we will send the state to the Child Actor message. Add the Set Get state from Parent vi to the event case. This will put the Boolean control state onto the queue of the Child Actor. The Do vi will then be called which will then run the method from within the Child Actor Class. This will then update the front panel indicator of the Child Actor.
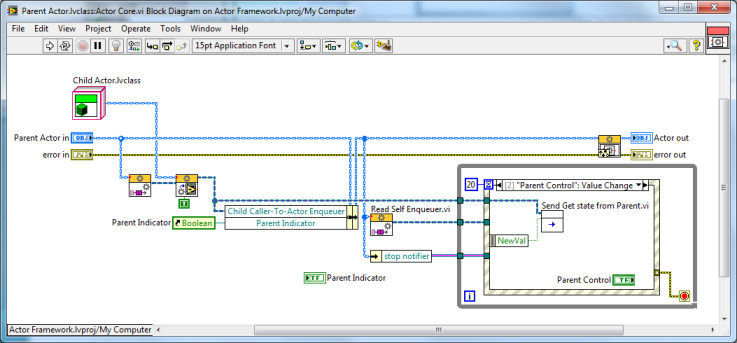
Save your project and run the Launcher vi. Notice that changing the control on the Parent Actor, changes the indicator of the Child Actor.
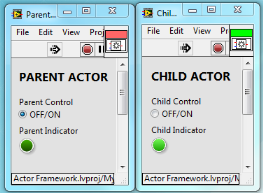
Child to Parent Actor
Now repeat the process to send the state from the Child Actor up to the Parent Actor.
- Add a method to the Parent Actor Class writing the state to the indicator reference
- Create the messages using the Actor Framework Message Maker tool
- Add an event case to the Child Actor to handle the state change
- Wire the control into the Send Get state from Child vi
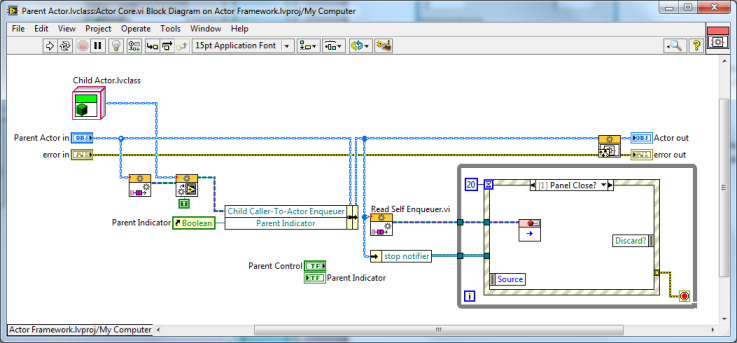
- Wire in the queue. You now need to get the caller enqueuer and wire that queue in.
- Save the project and it should now work
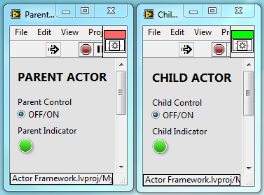
The final project should like something like this.
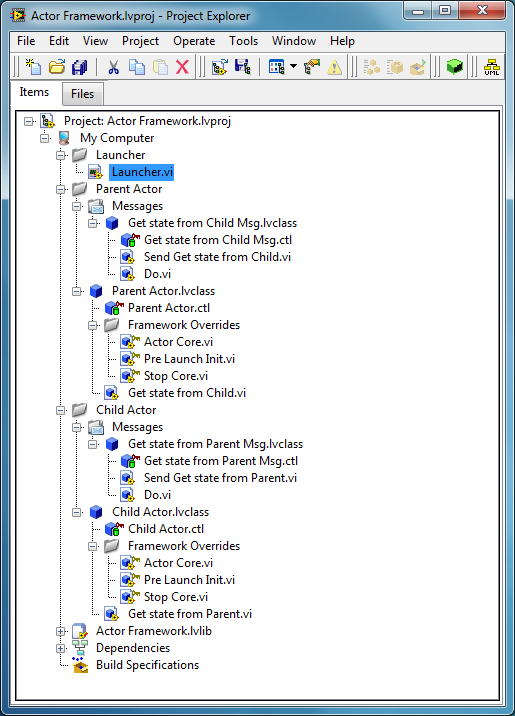
You are now able to send states both ways between the Parent and Child Actor.
I used these points to get a better understanding on how the Actor Framework works:
- The main program of an Actor is the Actor Core that is overridden from the base class
- Each Actor has its own queue
- Use the Actor Framework Message Maker tool to create messages to communicate between Actors
- Use the Read Self Enqueuer vi to get an Actors own queue
- Use Read Callers Enqueuer vi to get the queue of the Actor that Launched it
- Think of each Actor as its own process with a queue. To speak to a specific Actor, create a message and tell it which queue to execute on
It took me a week or so to get my head around what goes on. I still have a way to go but am getting there and the more I use it, the more confident I am getting. This is a very basic example but I feel it’s good to get going and to understand the framework without starting with a large project.
I have gone into detail with some of the above steps and breezed over others. I hope I have made the most important steps clear enough. If you are stuck with anything, please leave a comment and I will try help as much as I can. You can get a copy of the entire working project below. It has been written in LV2013 SP1.
Thanks for reading and I hope that I have been able to clear the fog over Actor Framework for some people.
Download Actor Framework LabVIEW code
Greg
