Blog

Raspberry Pi: 3x3x3 LED Cube

If you do a web search for LED cubes, you will notice that they have been built so many times and anything less than 8x8x8 is a bit of a waste of time. Knowing all of this, and basically because I am bored out of my mind, I decided to go ahead and build one with old parts lying around at home. 
I ended up with a small 3x3x3 LED cube connected to my Raspberry Pi. I chose 3x3x3 because no extra hardware is needed. All I needed to do was find 27 LED’s which I took off an old LED matrix sign board. 
The basic concept is this; the cube, in this case 3x3x3, is made up of columns (9) and layers (3).On each layer, all the cathodes are connected together and in each column, the anodes are connected together. Therefore, 12 ouputs are needed to control all 27 LED’s.
By driving the layer output low and the column output high, the specific LED will turn on. Driving both the layer and column output low, will turn the LED off. By sequencing what LED is on when, you can draw different patterns. The bigger the cube, the better patterns can be drawn.

Update:
I have drawn up a schematic to show the hardware connections for the cube and the cube to he RasPi’s GPIO header.

You can download a schematic here.

Take a look at this 32x32x32 LED cube that someone build.
I wrote my code in Python3.2 using the Rpi.GPIO library.

Greg

LabVIEW: Twitter toolkit

I have had this post in my head for a while but just haven’t gotten around typing it up yet. I came across the LabVIEW Twitter Toolkit some time ago and gave it a go. It took a while to understand all the security features, but once I got my head around that, everything went smoothly.

The place to start is here. This will guide you through setting up your Twitter Developer Account and creating your application credentials.
A few points to take note of:
  • You must add a callback URL, even if you just add your website. This field must be a valid URL and cannot be blank.
  • Your application must have read and write access.
  • Generate your Access Token if it has not been generated yet.
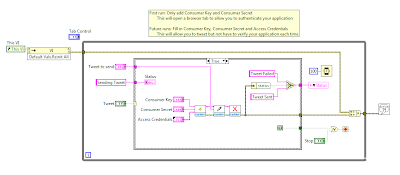
I have edited the basic single tweet example to count characters etc. Here is my version of the block diagram.
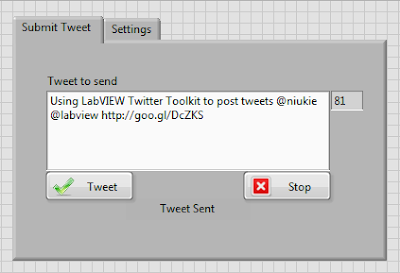
I count the characters in the Tweet string and if more than 140 are entered, I disable the Tweet button and change the font colour to red. The block diagram looks as follows.
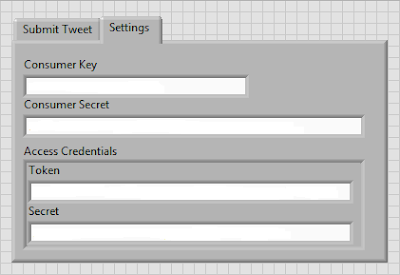
So the idea is, the first time you run the program after you have set up your Twitter Application, enter only the Consumer Key and Consumer Secret. Then type a tweet and press the Tweet button. A browser tab will open and ask you to verify your application. Do this and then the tweet will be posted.
Now enter your Access Credentials and use them for every tweet in the future. By explicitly entering the Access Credentials, you prevent having to authorise your application every time you send a tweet.
That is all there is to it. Once you have it all set up sending tweets from LabVIEW is pretty simple thanks to the toolkit.
Greg

LabVIEW: CLD Timing Engine

After working through the example programs from National Instruments, I found that most of them have a common trait. Since I have worked through the programs twice and seem to have an understanding of the architecture that I plan on using, that might all change later today – story for another day, I am focusing on getting set pieces of code together that I can generate quickly to save time.
One of the very important functions that I have been practicing is a Timing Engine. This Timing Engine needs to be able to be Started, Stopped, Paused, Reset, have a Target Time set, indicate whether the timer Has Elapsed and indicate the running Elapsed Time.
Here is my main program that I used to test my Timing Engine. It starts off by resetting the Timing Engine and setting a Target Time. It will then run until the Target Time has been reached at which time the Time Elapsed? indicator will be set. The Timing Engine can be paused by clearing the Advance Time control and reset by pressing the Reset control.
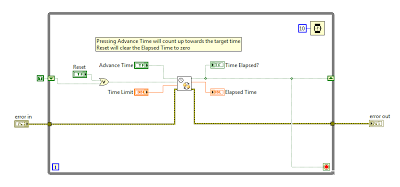
The actual Timing Engine looks like this. (I got the idea from one of the example programs so this is not entirely my own work.) I like the way it works and can be put together really quickly so works well for me.
Basically, a time stamp is taken each time the vi is run. The previous time stamp is subtracted from the current time stamp giving the change in time (dt). If the Advance Time control is set, dt is added to the Elapsed Time and if the Reset control is set the Elapsed Time is set to zero. Once the Elapsed Time reaches the Target Time, the indicator is set.
I have used this Timing Engine for the Car Wash, Sprinkler Controller and Boiler Controller and it works really well. There are many other ways to perform this same task, but this works for me and I hope it can help you in some way.
Greg

My Pursuit of LabVIEW CLD Status

Over the last few weeks I have been honing my LabVIEW programming skills. Not having a full-time job at the moment, very long story, makes this learning easier; I have a lot of time on my hands, but also trickier; I only have the four example exams from the NI website and my imagination to come up with programs to write. My mind also wonders onto Raspberry Pi, TI LaunchPad, running in the forest and various other distractions. 
As can be seen from my last post, I have worked through the four example exams with varying success. I have started round two to get my times down and skills up. So far so good.
I downloaded the example exams quite a while ago but for some reason I found myself back on the CLD e-kit webpage yesterday. Either a new download has recently been added or I just haven’t noticed it before, but there is a a download called Preparation: Download Certification Prep Exam Sample Exercises.
This folder is brilliant. Firstly, it gives you a break from writing long, complete programs and secondly, it explains/demonstrates some fundamental processes that can be used in your final programs. The exercises are also only around 45-60min long so great when you don’t have much time. 
I worked through 6 today and although I knew most of the principals, it was nice to get a reminder and refresher on some of the basics.
So if you don’t have the exercises yet, go and download them and have a look. 
Greg

    LabVIEW CLD Preparation

    I am busy getting ready for my LabVIEW CLD exam so working through the worked examples. I have just completed the first one, The ATM Machine and would really appreciate any feedback that you can provide.
    After looking at the solution, I realised that my version of the solution might have been a bit of overkill, but it works and this is a learning process for me. I will be adding all my solutions here so will try and keep this as clean as possible. If you do decide to comment, please not what solution you are commenting for.
    What I have learnt from the example exams:
    • If you get stuck on a section. leave it, carry on and come back to it later. It’s better to get as many sections completed as possible rather than having one section not working and the rest not done as time ran out. I got stuck on one section for 45min and was just getting frustrated with myself. I eventually got up and left it for a few hours, I know you cant do this in the exam. When I came back to look at it, I solved the problem in 5min, a Boolean constant was false instead of true.
    • Document, document, document. Do documentation as you are writing the code. There might be no time left at the end to get your documentation done and it is a HUGE part of the total mark. I still need to do much better here.
    • A quote that I heard while doing an edX online course. “Comments should describe things that aren’t obvious from the code: WHY, not what” John Ousterhout
    • Practice, practice, practice. There are a few tricky areas that I have picked up by doing the example programs. Small/simple things that have taken a lot of time to figure out. Just being aware of these might save you a lot of time.
    • Test your code regularly. The more you test the better the chance of you having a working program to submit. I test my code after every change I make. This might be overkill, but at least I know that I will always have working code with the functionality that I have added.
    • When I redo the example exams next week, I am going to start getting into the habit of backing up my code. I currently use Tortoise SVN to make regular backups but this is not available for the exam. Keep a working copy and backup after you finish a section.
    • Use breakpoints, extra indicators and the probe tool to debug. Sometimes a simple problem that can a long time to figure out, but this time can be drastically reduced by using the tools available.
    ————————————————————————————————————
    ATM Machine 1:
    Here are some questions that I have:
    • Is it necessary to provide HTML help files for every VI? Takes quite a bit of time which could be used elsewhere.
    • For the exam, do you need to make an executable to provide with the solution?
    • I know my ‘Enter Pressed’ case in the MHL needs some work.
    • Is there a way to update a single element in the Accounts.txt file or do you need to rewrite the whole file?
    You can find my post on the NI Forums here.
    ————————————————————————————————————
    Boiler Controller 1:
    I have just finished the Boiler Controller example. This took me around 5 hours so I’m getting quicker. Need to practice some common VI’s that I use so that I can get those done quickly. I found the question not as clear as the ATM Machine but I think I got there.
    Some questions again:
    • The Stop button; is that just to stop the application because the shutdown button just restarts the application.
    • I ended up using quite a few local variables but not sure if that’s OK. Is there another way to do things. The main place I used them was for the start and shutdown process to remember the button states and valve position value.
    • My Time Count only counts in seconds. Is it necessary to count in milliseconds?
    • Is it necessary to disable any controls or indicators during certain steps? As far as I can see it doesn’t say so.
    ————————————————————————————————————
    Car Wash 1:
    This exam was by far the trickiest so far. Once I managed to get my head around the timing system, then the rest of the program just fell into place. I started yesterday and finished it this morning for a total time of around just over 5 hours. Practice is still needed but I am slowly starting to used to some concepts which I will study and hope to be able to use in the CLD exam.
    Only one questions this time:
    • Is it better to update the display in an Update Display case or each time outside the case but inside the While loop like I did in this program? I found it easier to do it this way.
    ————————————————————————————————————
    Sprinkler System 1:
    I finished the Sprinkler system in just over 4 hours which included being stuck on one part for over an 45min. Out of the four examples, I feel this one was the easiest to complete. I am not sure if is because of the practice that I have been having, or because it is the easiest question. I feel that I am getting there which is good.
    Next is to practice some common components that I can build quickly to save time, like the timing engine and getting the front panel built as quick as possible.
    ————————————————————————————————————
    Thanks in advance for all your advice.
    Greg