LabVIEW: Creating Custom Templates and Sample Projects

The new ‘Create Project’ feature added to LabVIEW 2012 is great and I use it a lot when starting a program. However, I found myself making common changes to the templates before I started writing a program. The main changes were removing the ‘Something’ buttons and events. This isn’t a lot of work but does take time and becomes rather tedious.
 
One solution is to use the Create Project feature with a custom template. It is rather easy to set up and works really well after getting over a few minor hurdles.
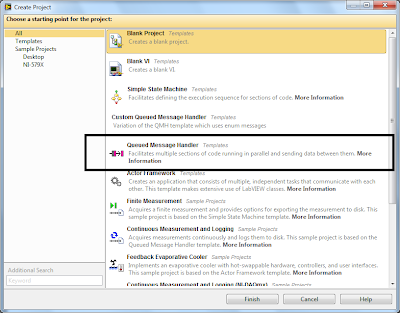
I started off with creating a new QMH project from the default template. I made a few changes to the project and then saved the project how I wanted the template to work.
Some of the changes that I made were:
  • Removing the Something and Something Else buttons, events and cases
  • Changed the queue message from a String to a Type Def Enum. This makes the Consumer case a lot easier to set up and eliminates spelling mistakes
  • Added a case to read in a configuration XML file
  • Replaced constants with variable constants
  • Remove the Stop button to use the ‘X’ to stop the program


Once you have the template set up, save the project and close it. Navigate to the ‘LabVIEW Data’ folder in ‘My Documents’. Inside this folder, create new folders with the following structure. 
–ProjectTemplates
      |–CategoryOverides
      |–MetaData
      |–Source
 
Place your template into the Source folder. Make sure that Auto Populating Folders is DISABLED in the .lvproj. This caused me a lot of troubles getting set up.
 
The next thing to do is create an xml file in the MetaData folder. Call this file TemplateMetaData.xml. I used the default xml file as a template to get started. This is what my file looks like:

To get an explanation on the different keywords, have a look at this white paper from NI.
Once you have the xml file saved in the MetaData folder and the template project in the Source folder, you should be ready to go.

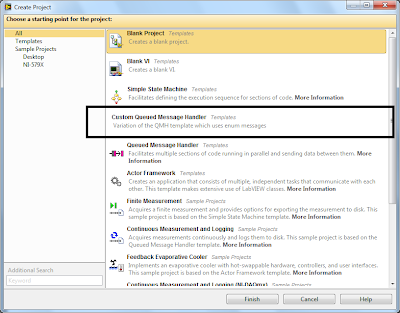
As can be seen from above, my custom project is now added to the Create Project wizard. Just follow the normal wizard to create a new project and get programming right away.
 
The main problem that I ran into was setting my folders to auto populate in the template. Once I switched that off everything ran smoothly.
 
Have fun creating new templates and projects.
 
Greg

LabVIEW: Looking at constants differently

I have started listening to the LabVIEW podcast by VI Shots and am finding them really interesting. The last one I listened to was Five Tips to improve your LabVIEW Application with Fabiola De La Cueva. After listening to the podcast, I could relate to most of the tips and see where I was going wrong.
 
Then earlier this week I attended NI Days where I went to a presentation by LabVIEW Champion, Steve Watts and he spoke about the same subject. This triggered in my head that I should start to make an effort to create a set of rules for myself to stick to in all my applications.
 
So today I started by looking at constants differently.
 
This is from Fabiola’s presentation where she asks what is a constant?
As can be seen from the slide above, PI is a constant, the number of seconds in a minute is a constant but the number of flux capacitors in the DeLorean might change so is therefore not a constant. 

This means that using ‘constants’ in a program should be limited to ‘True Constants’ and ‘Variable Constants’ should either be wrapped in a vi or loaded from a configuration file.

Wrapping a constant in a vi and adding all your applications’ constants to the project makes them easy to manage and change if needed.
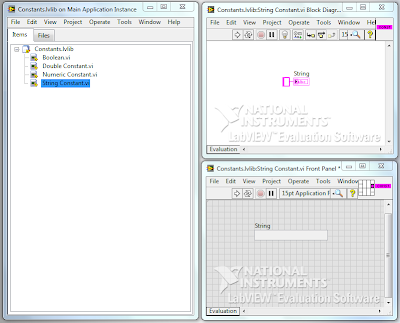
I have created a library which I will add to all my projects. This library will then be used as a template for the most common constants used in an application. I then make copies of each as needed, name them ‘xxx_constant.vi’ and use a comment in the application to indicate what the constant does.

I have tried to keep the icon colour the same as the default wire colour for each type making reading the application easier. You can get a copy of my library below if you want to have a look at it or use it.

The other method mentioned in the presentation is reading variable constants in from a configuration file. I have also tried this using an XML file which works well and is quick to implement. I will do another post with my vi’s I used some other time.

I hope this post has been able to help someone use better style. If I have done something wrong or not understood the concept properly, please leave a comment and let me know so that I can correct it and learn better style.

Greg

LabVIEW and Raspberry Pi TCP/IP Communications

A few months ago I did the LabVIEW Connectivity course at National Instruments UK. I really enjoyed it but haven’t got around to trying any of the concepts out yet. Last week I decided to write a TCP/IP chat program working between LabVIEW running on my Windows laptop and Python running my Raspberry Pi.
On the left of the you can see the LabVEIW front panel running the server. On the right is the putty terminal running a Python client. At the moment I only have the functionality to connect one client to the server.
This little project got me thinking and I learnt quite a few new concepts.
LabVIEW Server:
I used the LabVIEW example finder to get started.
The LabVIEW server starts off my listening for connections. I have set a 60 sec timeout for this wait. Once connected, there are two parallel loops running. One loop is used to transmit strings and the other loop is used to receive strings.
To transmit a string, the user types the string in the User Input control and presses the Return key. An end of line character is then concatenated onto the string which is transmitted using TCP Write.
To receive a string, the TCP Read function listens with a timeout of 100 ms. If a string is received, it is concatenated onto the Response String indicator.
Python Client:
This is where things got interesting. I needed to use threads, timeouts and sockets, each of which I have never used before. This client was written in Python 3.2.

I ended up using two threads. One for the transmit and the other for the receive controls.

I used a global variable which is used to stop the threads when the client or server is stopped. I also needed to use a timeout in both the transmit and receive thread because the recv() and readline() methods blocked the program flow which locked up the threads if the client was stopped.

With the timeout set, I could monitor the global variable and return cleanly from the thread when the client or server was stopped.

First start the LabVIEW server, then within 60 sec run the Python client. The connection will be established and you will be able to send strings between LabVIEW and the Raspberry Pi. To stop the programs, either use the Stop button in LabVIEW or CTRL+C in Python. Both methods will stop both the server and the client.

I am sure there are many methods to do what I have done here, even better, cleaner ones. My Python is all self taught and only being used for my hobbies. I am using my Raspberry Pi for what is was designed for; learning. If you can recommend a better way to do this, please let me know because I am always keen to learn something new.

Greg
LabVIEW: Twitter toolkit

I have had this post in my head for a while but just haven’t gotten around typing it up yet. I came across the LabVIEW Twitter Toolkit some time ago and gave it a go. It took a while to understand all the security features, but once I got my head around that, everything went smoothly.

The place to start is here. This will guide you through setting up your Twitter Developer Account and creating your application credentials.
A few points to take note of:
  • You must add a callback URL, even if you just add your website. This field must be a valid URL and cannot be blank.
  • Your application must have read and write access.
  • Generate your Access Token if it has not been generated yet.
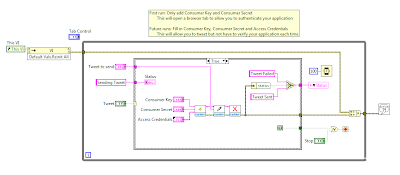
I have edited the basic single tweet example to count characters etc. Here is my version of the block diagram.
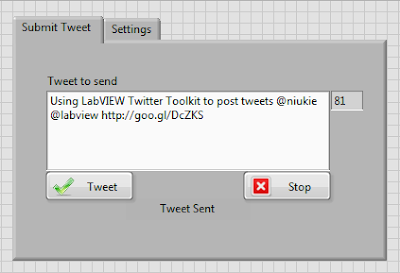
I count the characters in the Tweet string and if more than 140 are entered, I disable the Tweet button and change the font colour to red. The block diagram looks as follows.
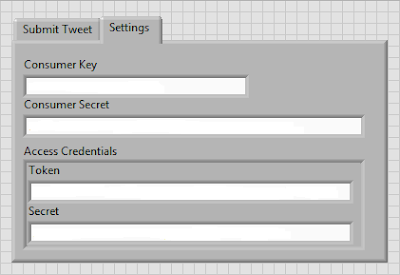
So the idea is, the first time you run the program after you have set up your Twitter Application, enter only the Consumer Key and Consumer Secret. Then type a tweet and press the Tweet button. A browser tab will open and ask you to verify your application. Do this and then the tweet will be posted.
Now enter your Access Credentials and use them for every tweet in the future. By explicitly entering the Access Credentials, you prevent having to authorise your application every time you send a tweet.
That is all there is to it. Once you have it all set up sending tweets from LabVIEW is pretty simple thanks to the toolkit.
Greg

LabVIEW: CLD Timing Engine

After working through the example programs from National Instruments, I found that most of them have a common trait. Since I have worked through the programs twice and seem to have an understanding of the architecture that I plan on using, that might all change later today – story for another day, I am focusing on getting set pieces of code together that I can generate quickly to save time.
One of the very important functions that I have been practicing is a Timing Engine. This Timing Engine needs to be able to be Started, Stopped, Paused, Reset, have a Target Time set, indicate whether the timer Has Elapsed and indicate the running Elapsed Time.
Here is my main program that I used to test my Timing Engine. It starts off by resetting the Timing Engine and setting a Target Time. It will then run until the Target Time has been reached at which time the Time Elapsed? indicator will be set. The Timing Engine can be paused by clearing the Advance Time control and reset by pressing the Reset control.
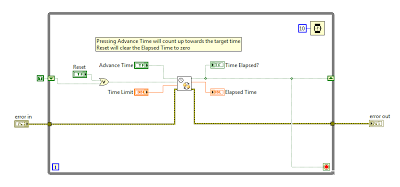
The actual Timing Engine looks like this. (I got the idea from one of the example programs so this is not entirely my own work.) I like the way it works and can be put together really quickly so works well for me.
Basically, a time stamp is taken each time the vi is run. The previous time stamp is subtracted from the current time stamp giving the change in time (dt). If the Advance Time control is set, dt is added to the Elapsed Time and if the Reset control is set the Elapsed Time is set to zero. Once the Elapsed Time reaches the Target Time, the indicator is set.
I have used this Timing Engine for the Car Wash, Sprinkler Controller and Boiler Controller and it works really well. There are many other ways to perform this same task, but this works for me and I hope it can help you in some way.
Greg